+ - 0:00:00
Notes for current slide
Notes for next slide

Unleash Shiny

R/Pharma - Advanced Shiny Workshop

David Granjon (Novartis) & John Coene (World Economic Forum)

09-10-2020

1 / 78

About us

David

Data Scientist at Novartis

@divadnojnarg

John

Data scientist at the World Economic Forum

@jdatap

Colin

Shiny Expert at ThinkR

@_ColinFay

2 / 78

Program

We're in for 4 hours of fun!

  • Grab a โ˜•
  • Make yourself comfortable ๐Ÿ›‹ or ๐Ÿง˜
  • Ask questions โ“
  1. Intro + Quiz (5 min)
  2. Develop custom templates with Shiny (45 min)
  3. โ˜• + โ“ (10 min) (total: 1h)
  4. Unleash Shiny's interactivity (80 min)
  5. โ˜• + โ“ (10 min) (total: 2h30)
  6. Innovative approach to custom outputs (60 min)
  7. โ˜• + โ“ (10 min) (total: 3h40)
  8. Shiny's hidden or less documented features (20 min) (total: 4h)

Disclaimer: this workshop is not about building Shiny Apps!!!

3 / 78

Workshop Material

  • To avoid connection issues, disconnect from your VPN!
  • Somes slides contain code that you may run (a sandbox space is available in RStudio Cloud)

4 / 78

Introduction

5 / 78

Shiny or not Shiny?

6 / 78

Shiny or not Shiny?

7 / 78

Shiny or not Shiny?

8 / 78

A simple Shiny app

No HTML/CSS/JS and it just works ๐Ÿ˜จ! What kind of magic is this?

9 / 78
10 / 78

Part 1. Custom Templates with Shiny

11 / 78

A. Shiny generates HTML from R

Warm up 1

  1. Run the following code:
p("Hello World")
  1. Copy and paste this code to the R console. What do you observe?
12 / 78

A.1.1 Introduction to HTML: tags

The simplest HTML skeleton

<!DOCTYPE HTML>
<html>
<head>
<!-- head content here -->
</head>
<body>
<!-- body content here -->
</body>
</html>

There are 2 types of tags:

  • paired-tags:<div></div>
  • self closing tags: <img/>

We classify them by usage:

  • structural tags: <head></head>, <body></body>
  • control tags: <script></script>, <button></button>
  • formatting tags: <font></font>

Block vs inline:

  • <div><p>Hello World</p></div>: Good
  • <span><div><p>Hello World</p></div></span>: not good
13 / 78

A.1.2 Introduction to HTML: attributes

Attributes specify the tags properties

<div class="awesome-item" id="myitem"></div>
<!-- the class awesome-item may be applied to multiple tags -->
<span class="awesome-item"></span>

The most common attributes:

  • class may be shared between multiple tags
  • id is unique
  • non standards attributes like data-toggle


Attributes are used by CSS and JavaScript to interact with the web page!

14 / 78

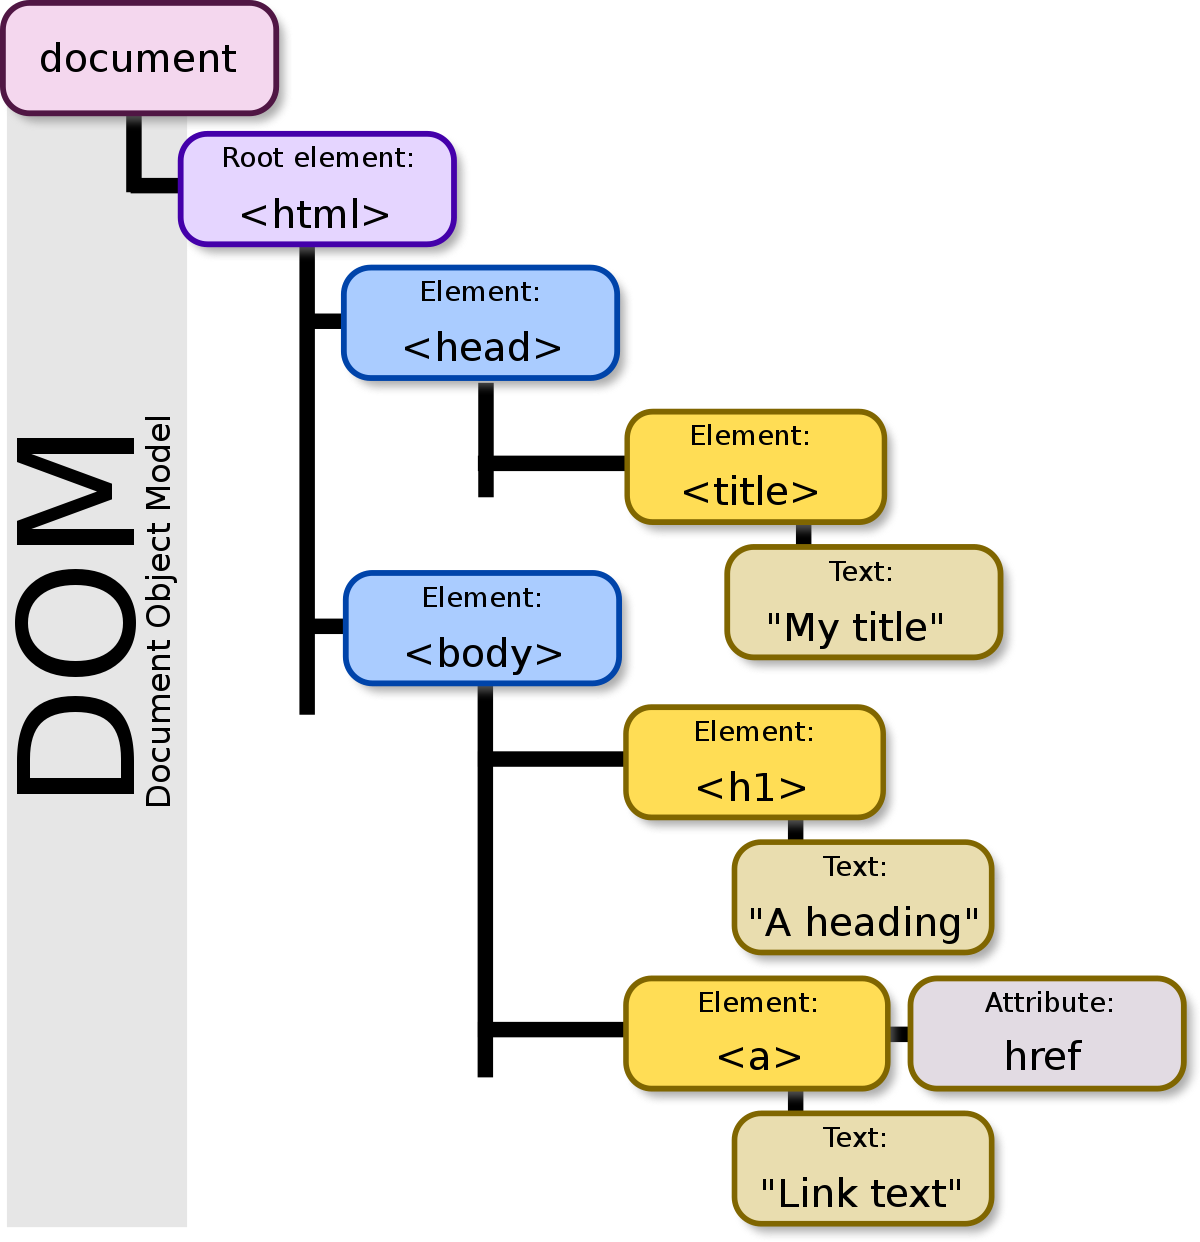
A.2 About the Document Object Model

DOM is a convenient representation (tree) of the HTML document. We inspect the code of any web page with Firefox or Chrome:

  • after a right click and selecting inspect
  • after clicking on F12 (windows), fn + F12 (Mac)
library(shiny)
ui <- fluidPage(p("Hello World"))
server <- function(input, output) {}
shinyApp(ui, server)
  1. Run the above app, right click on the only text element and select inspect
  2. In the Elements panel, double click between the <p></p> tag to edit the current text. Press enter when finished

15 / 78

B. Unleash {htmltools}

{htmltools} is a R package designed to:

  • Generate HTML tags from R
  • Handle web dependencies: add, remove, resolve, ...

Historically, {htmltools} was extracted out of {shiny} to extend it. That's why, both packages have many common functions!

At the moment, {htmltools} does not have any user guide, although being an important package for all web things

16 / 78

C. Discover Shiny dependencies

Warm up 2

Let's play ๐ŸŽฎ:

  1. Run the app runExample("01_hello")
  2. Open the HTML inspector
  3. Delete the bootstrap.min.css and ion.rangeSlider.css
  4. Conclusions

The htmtools::findDependencies function allows to get the dependencies from a tag.

findDependencies(fluidPage())
17 / 78

C.1.1 Handle dependencies

How would you include JS/CSS in a Shiny app?

Works but not portable

fluidPage(
tags$head(
tags$style(...),
tags$script(src = "path-to-script"),
tags$script(
"$(function() {
// JS logic ...
});
"
)
)
)

With {htmltools}, we define the dependency with htmlDependency, then attach it to a tag with tagList:

use_bs4_dep <- function(tag) {
bs4_dep <- htmlDependency(
name = "Bootstrap 4",
version = "1.0",
src = c(href = "https://maxcdn.bootstrapcdn.com/bootstrap/4.0.0/css/"),
stylesheet = "bootstrap.min.css"
)
tagList(tag, bs4_dep)
}
use_bs4_dep(fluidPage())
18 / 78

C.1.2 From HTML to R ๐Ÿง™โ€โ™‚๏ธ

HTML VS R

In HTML, we have:

<div class="divclass" id = "daddy">
<h1>A child</h1>
<span class="child" id="baby">Crying</span>
</div>

The corresponding R code is

mytag <- div(
class = "divclass",
id = "daddy",
h1("A child"),
span(class = "child", id = "baby", "Crying")
)

Some tags like <nav></nav> need the tags$ prefix before (tags is a list of functions). The withTags function to use tags$<tagName>

19 / 78

C.1.3 Automate the conversion?

This process is not interesting and time consuming!

Tools exist:

  • html2R Shiny app converts HTML to R (thanks Alan Dipert)
  • {charpente} does the same from the R console with html_2_R

Code conversion by {charpente}

html_2_R('<div class="divclass" id = "daddy"></div>')
## div(
## class = "divclass",
## id = "daddy"
## )
20 / 78

C.2.1 Accessing R tags attributes

How to access name, attributes, children?

We could use str(mytag) to inspect the structure of the R object.

mytag$attribs
## $class
## [1] "divclass"
##
## $id
## [1] "daddy"
mytag$children
## [[1]]
## <h1>A child</h1>
##
## [[2]]
## <span class="child" id="baby">Crying</span>
21 / 78

C.2.2 Manipulate R tags

Add new attributes

There are 2 methods:

  • tagAppendAttributes(tag, list of attributes) is preferred
  • tag$attribs[["new-attribute"]] <- value

Add child/children

  • tagAppendChild(tag, child)
  • tagAppendChildren(tag, list of children)

There exist other functions but we'll not use them.

22 / 78

C.2.3 Programmatically create elements

Let's create 5 span tags!

div(
span(1),
span(2),
span(3),
span(4),
span(5)
)

What about 100 tags ๐Ÿ˜ฑ?

With some functional programming!

# base R
div(lapply(1:5, function(i) span(i)))
# purrr + %>%
map(1:5, function(i) span(i)) %>% div()
23 / 78

D. Practice: bulma

In the following, you'll reconstruct the {shinybulma} package step by step!

Main tasks:

  • Import bulma dependencies
  • Generate the main page function

Lets' start! Open shinybulma.Rmd and enjoy ๐Ÿ’

25:00
24 / 78

Part 2. Unleash Shiny's Interactivity

25 / 78

A.1 Inputs are key to interactivity

Inputs are key elements of web applications. They drive user interactions like:

  • configure parameters
  • fill and submit a form
  • ...


{shiny} brings various inputs like sliderInput, numericInput, ...


How does all this even work ๐Ÿงš?

26 / 78

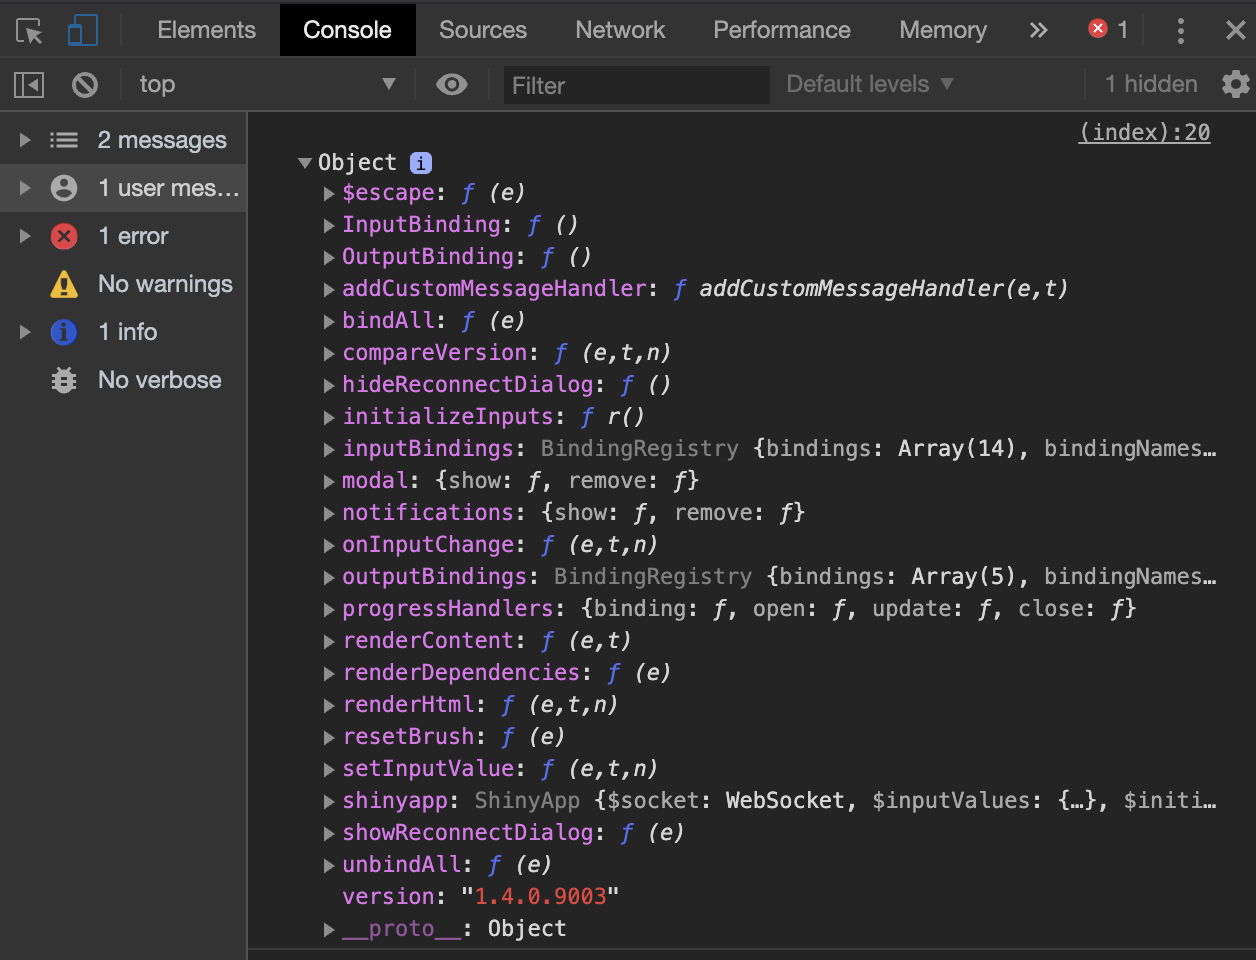
A.2 Shiny heavily relies on JavaScript (JS)

One very big shiny.js* responsible for:

  • registering input/output
  • handling every single input/output action
  • initializing and controlling the websocket ๐Ÿงฆ (the whaaaat?)
  • handling alerts/modals/notifications
  • ...

JS source may be found here. In short all these files are concatenated, giving shiny.js and *shiny.min.js!

27 / 78

A.2.1 Introduction to JS and jQuery

  1. Primary role: create dynamic and interactive pages
  2. How? Interact with the DOM elements (modify, remove, add)
  3. JS is run on the client (web browser)
  4. JS is object oriented
var myNumber = 1; // affectation
myNumber--; // decrement
console.log(myNumber); // print 0
const you = {
name: 'your name', // property
music : 'your favorite music',
printName: function() { // method
console.log(`I am ${this.name}`); // here "this" is the object
}
}
you.geek = true; // add extra property
28 / 78

A.2.2 jQuery, "Write less, do more"

jQuery is a JS library, not another language!

var $ = jQuery; // usually you don't need this since Shiny already does it
$(selector).action(); // jQuery's philosophy
29 / 78

A.2.3 jQuery and CSS selectors

In the next steps, we'll have to select elements from the DOM.

30 / 78

A.2.4 jQuery and event listeners

An event listener is a program that triggers when a given event occurs, like after a mouse click.

<button id="mybutton">Go ! </button>

With vanilla JS:

var btn = document.getElementById('mybutton'); // select the button
btn.addEventListener('click', function() { // action + consequences
alert('You clicked me!'); // action
});

With jQuery:

$('#mybutton').on('click', function() {
alert('You clicked me!');
});

Hopefully you are convinced that jQuery is less verbose than pure JS!

31 / 78

A.3.1 R and JS

Let's consider the following app

ui <- fluidPage(
textInput("text", "My text", "Some text"),
actionButton("update", "Update")
)
server <- function(input, output, session) {
observeEvent(input$update, {
updateTextInput(session, "text", value = "Updated text")
})
}
shinyApp(ui, server)

Waiiit!!

  • How does JS knows that R wants to update the text value โ“
  • How does Shiny knows when to send back the updated text to R โ“
32 / 78

A.3.2 The Shiny JS object

Did you know that Shiny is also a JavaScript object โ“

Run this app and open the HTML inspector.

ui <- fluidPage(
tags$script(
"$(function() {
console.log(Shiny);
});
"
)
)
server <- function(input, output) {}
shinyApp(ui, server)

33 / 78

A.3.3.1 Websockets

34 / 78

A.3.3.2 Shiny and Websocket

This is the magic piece allowing bidirectional communication between R and JavaScript. The technology behind is provided by {httpuv} and {websocket}.

  1. Run the previous app
  2. Open the HTML inspector
  3. Select the Network tab
  4. Search for websocket
  5. Play with the app and observe!

35 / 78

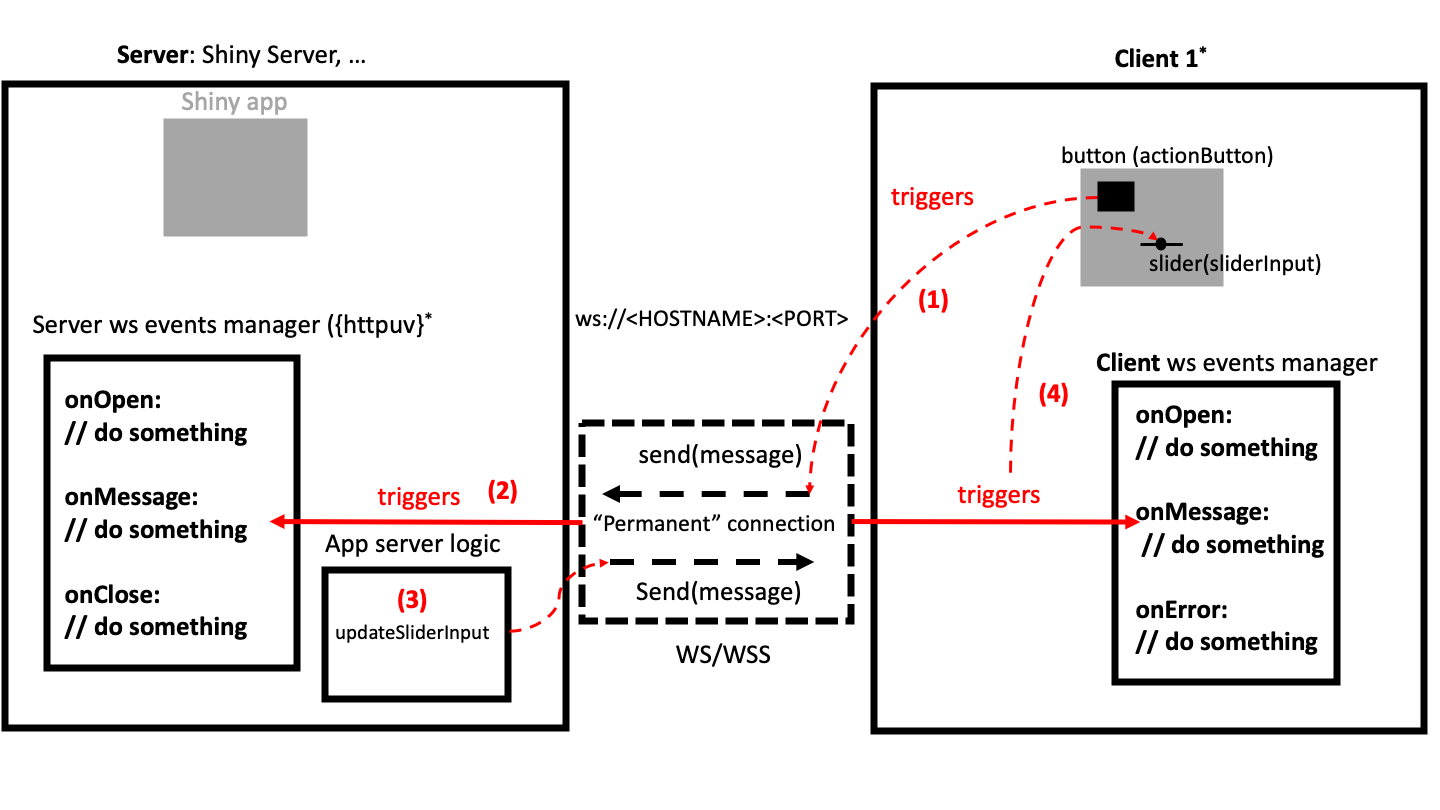
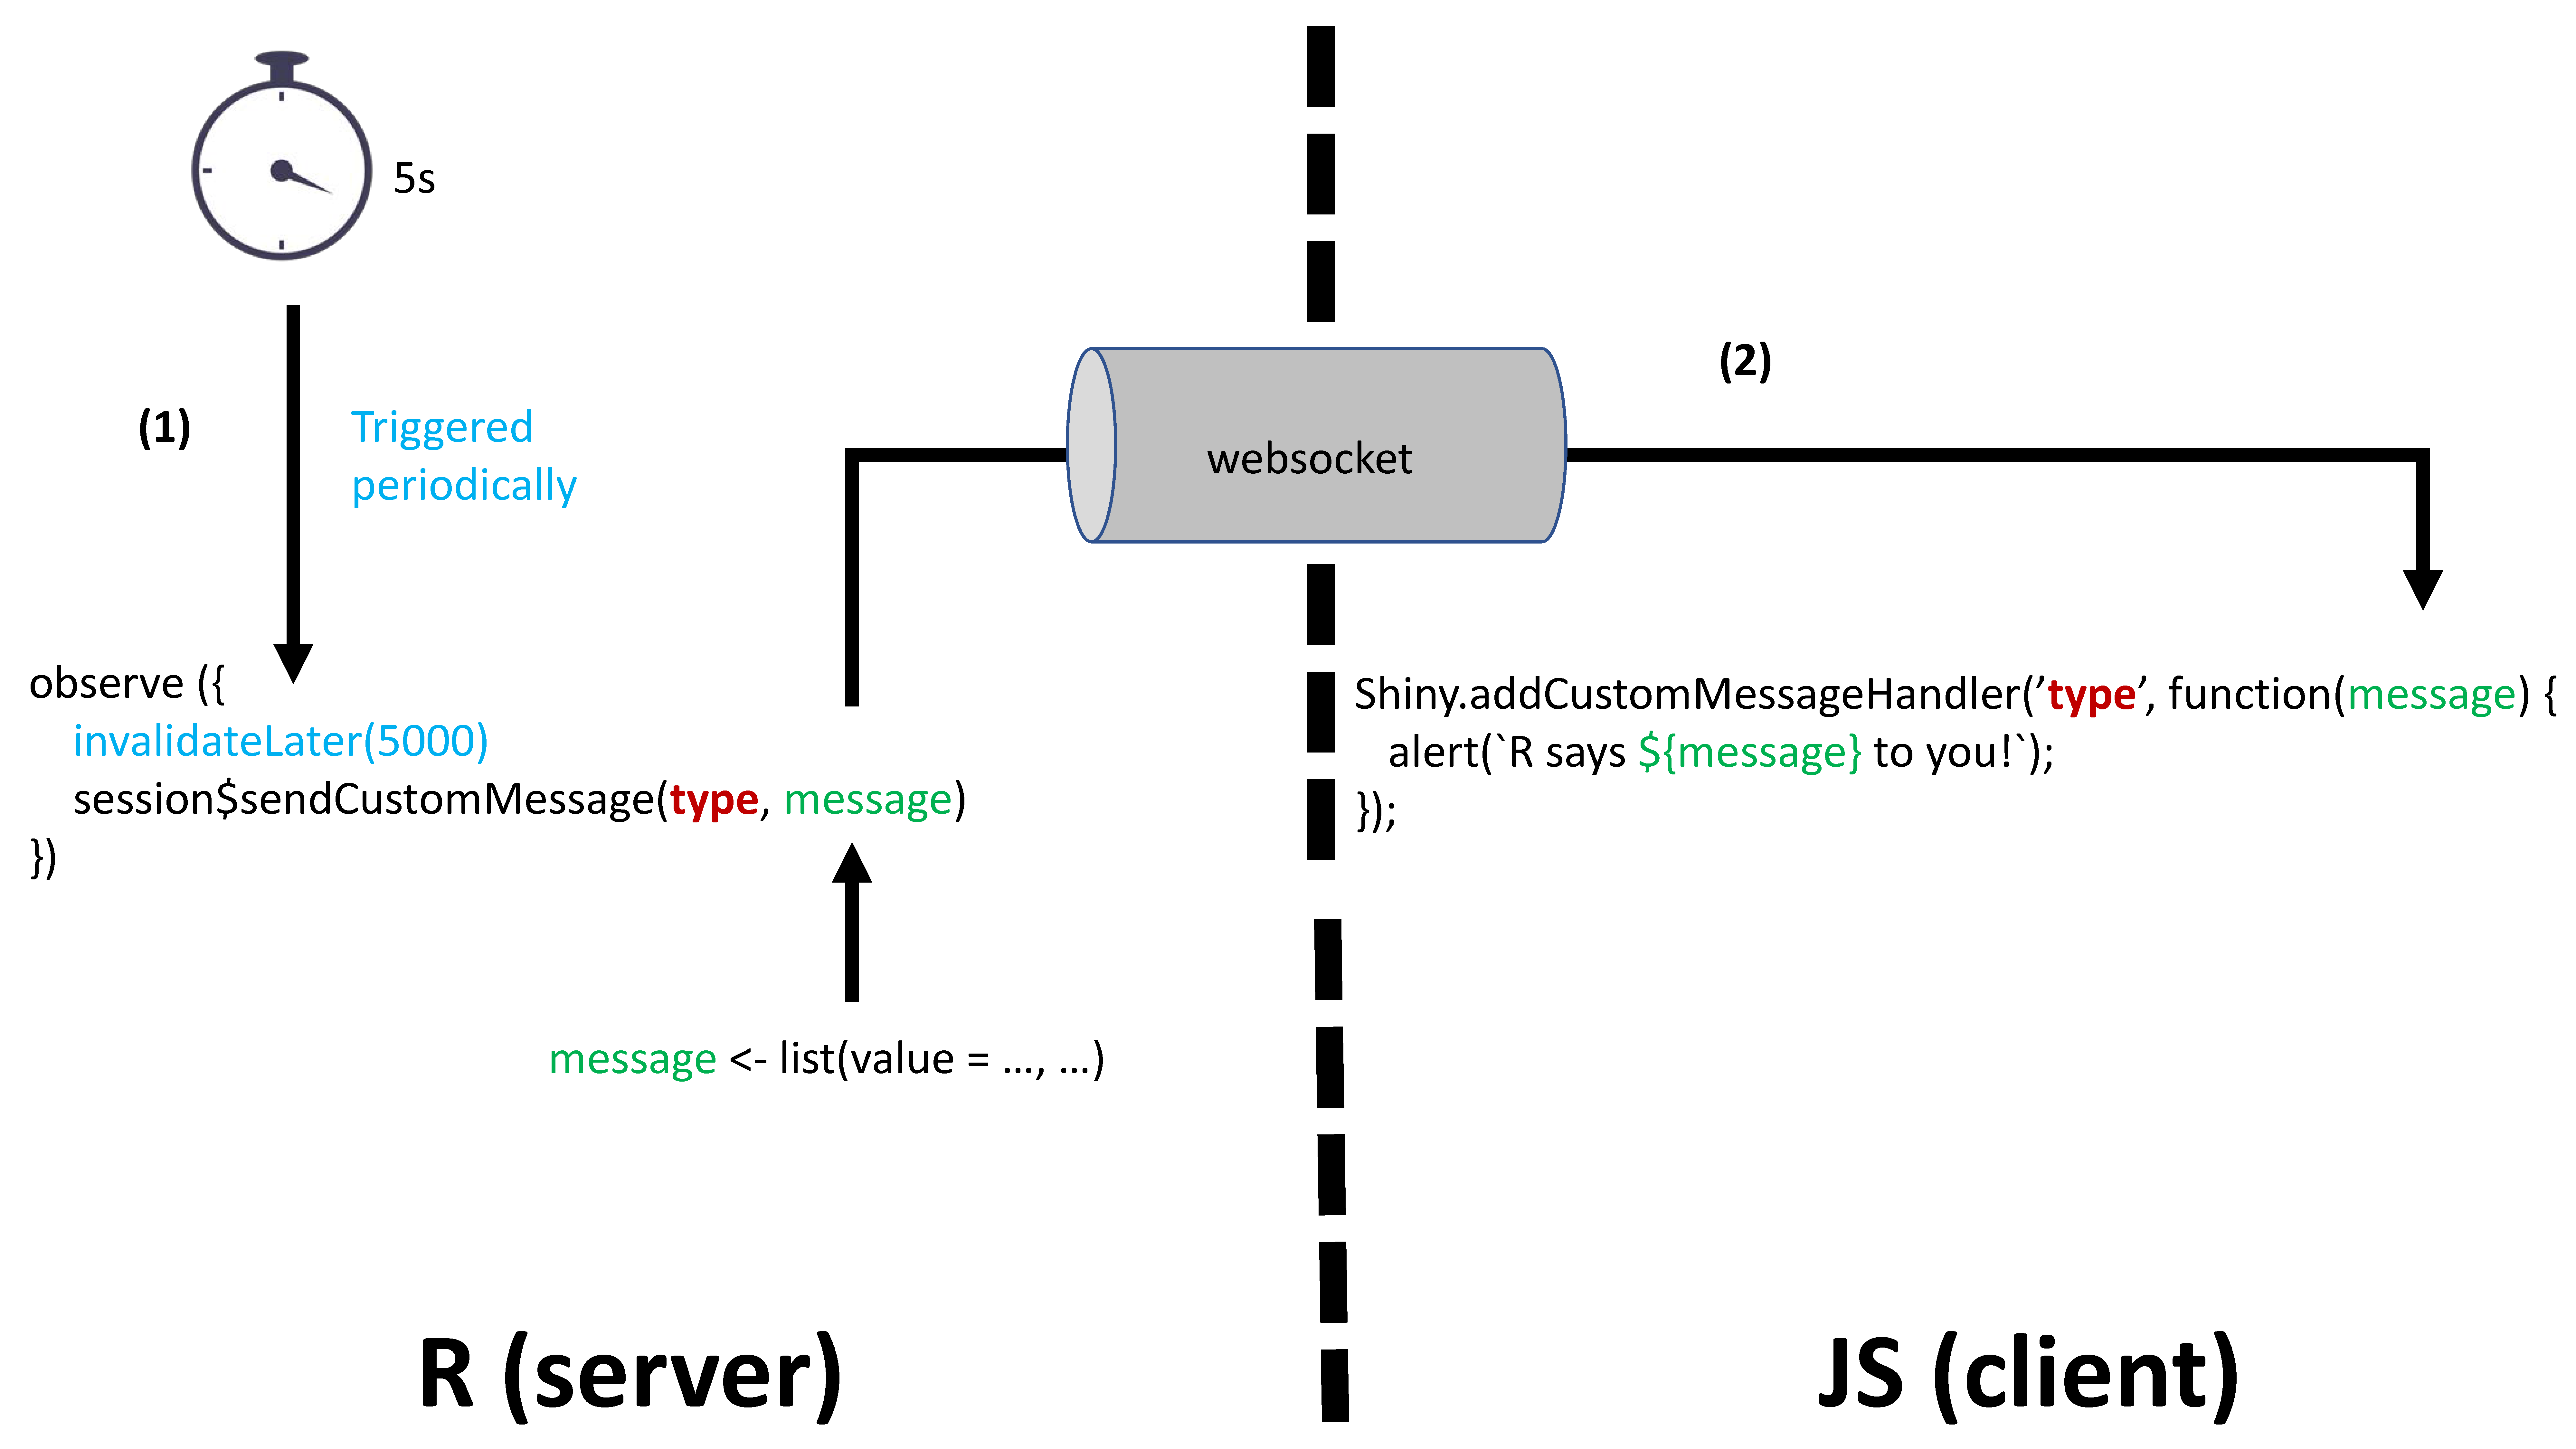
A.3.4 From R to JS, from JS to R

On the R side session is an instance of the ShinySession R6 class allowing to send messages to JS.

2 main methods:

  • sendCustomMessage sends R messages to JS
  • sendInputMessage sends R messages to input bindings


Shiny.addCustomMessageHandler is the JS part of session$sendCustomMessage. Both are linked by the type parameter!

36 / 78

A.4 Bulma JS for Shiny

In this part you'll need to work on the following RStudio Cloud project. We split the audience in 3 groups (1 instructor per group). Each group will choose between:

  • Notifications, doc here
  • Modal, doc here

After the workshop, you'll have the opportunity to bring this change to the shinybulma repository.

20:00
37 / 78

B.1.1 The Shiny input system

Input tag structure

Input tags have various HTML structure.

<input id = inputId type = "text" class = "input-text" value = value>

The simplest is probably the text input:

  • id guarantees the input uniqueness. 1
  • type define the input type
  • class is generally targeted by JavaScript: $('.input-text').action();
  • value holds the input value

1 All instances of the same input share a unique input binding. Hence, id is mandatory!

38 / 78

B.1.2 The Shiny input system

Binding Shiny inputs

An input binding:

  • Allows Shiny to identify each instance of a given input
  • Describes what you may do with it.
  • Receives messages from R ...
  • ... tells when Shiny has to update the value for R

๐Ÿ—’ Bindings rely on a JS class defined in the input_binding.js file

var customTextBinding = new Shiny.InputBinding();

In the following, we'll need devtools::install_github("DivadNojnarg/OSUICode")

39 / 78

B.2.1 The binding steps: find

The idea is to locate the input in the DOM.

We generally filter by class, scope being the document.

find: function(scope) {
console.log($(scope).find('.input-text'));
return $(scope).find('.input-text');
}

Run the following and open the HTML inspector.

library(OSUICode)
customTextInputExample(1)

40 / 78

B.2.3 The binding steps: get the value

This step ensures that R gets the input value at any time. The jQuery val method allows to get the current value.

getValue: function(el) {
return $(el).val();
}
  1. Run the following and open the HTML inspector
  2. Update the text content
  3. What happens? Why?
customTextInputExample(2)
41 / 78

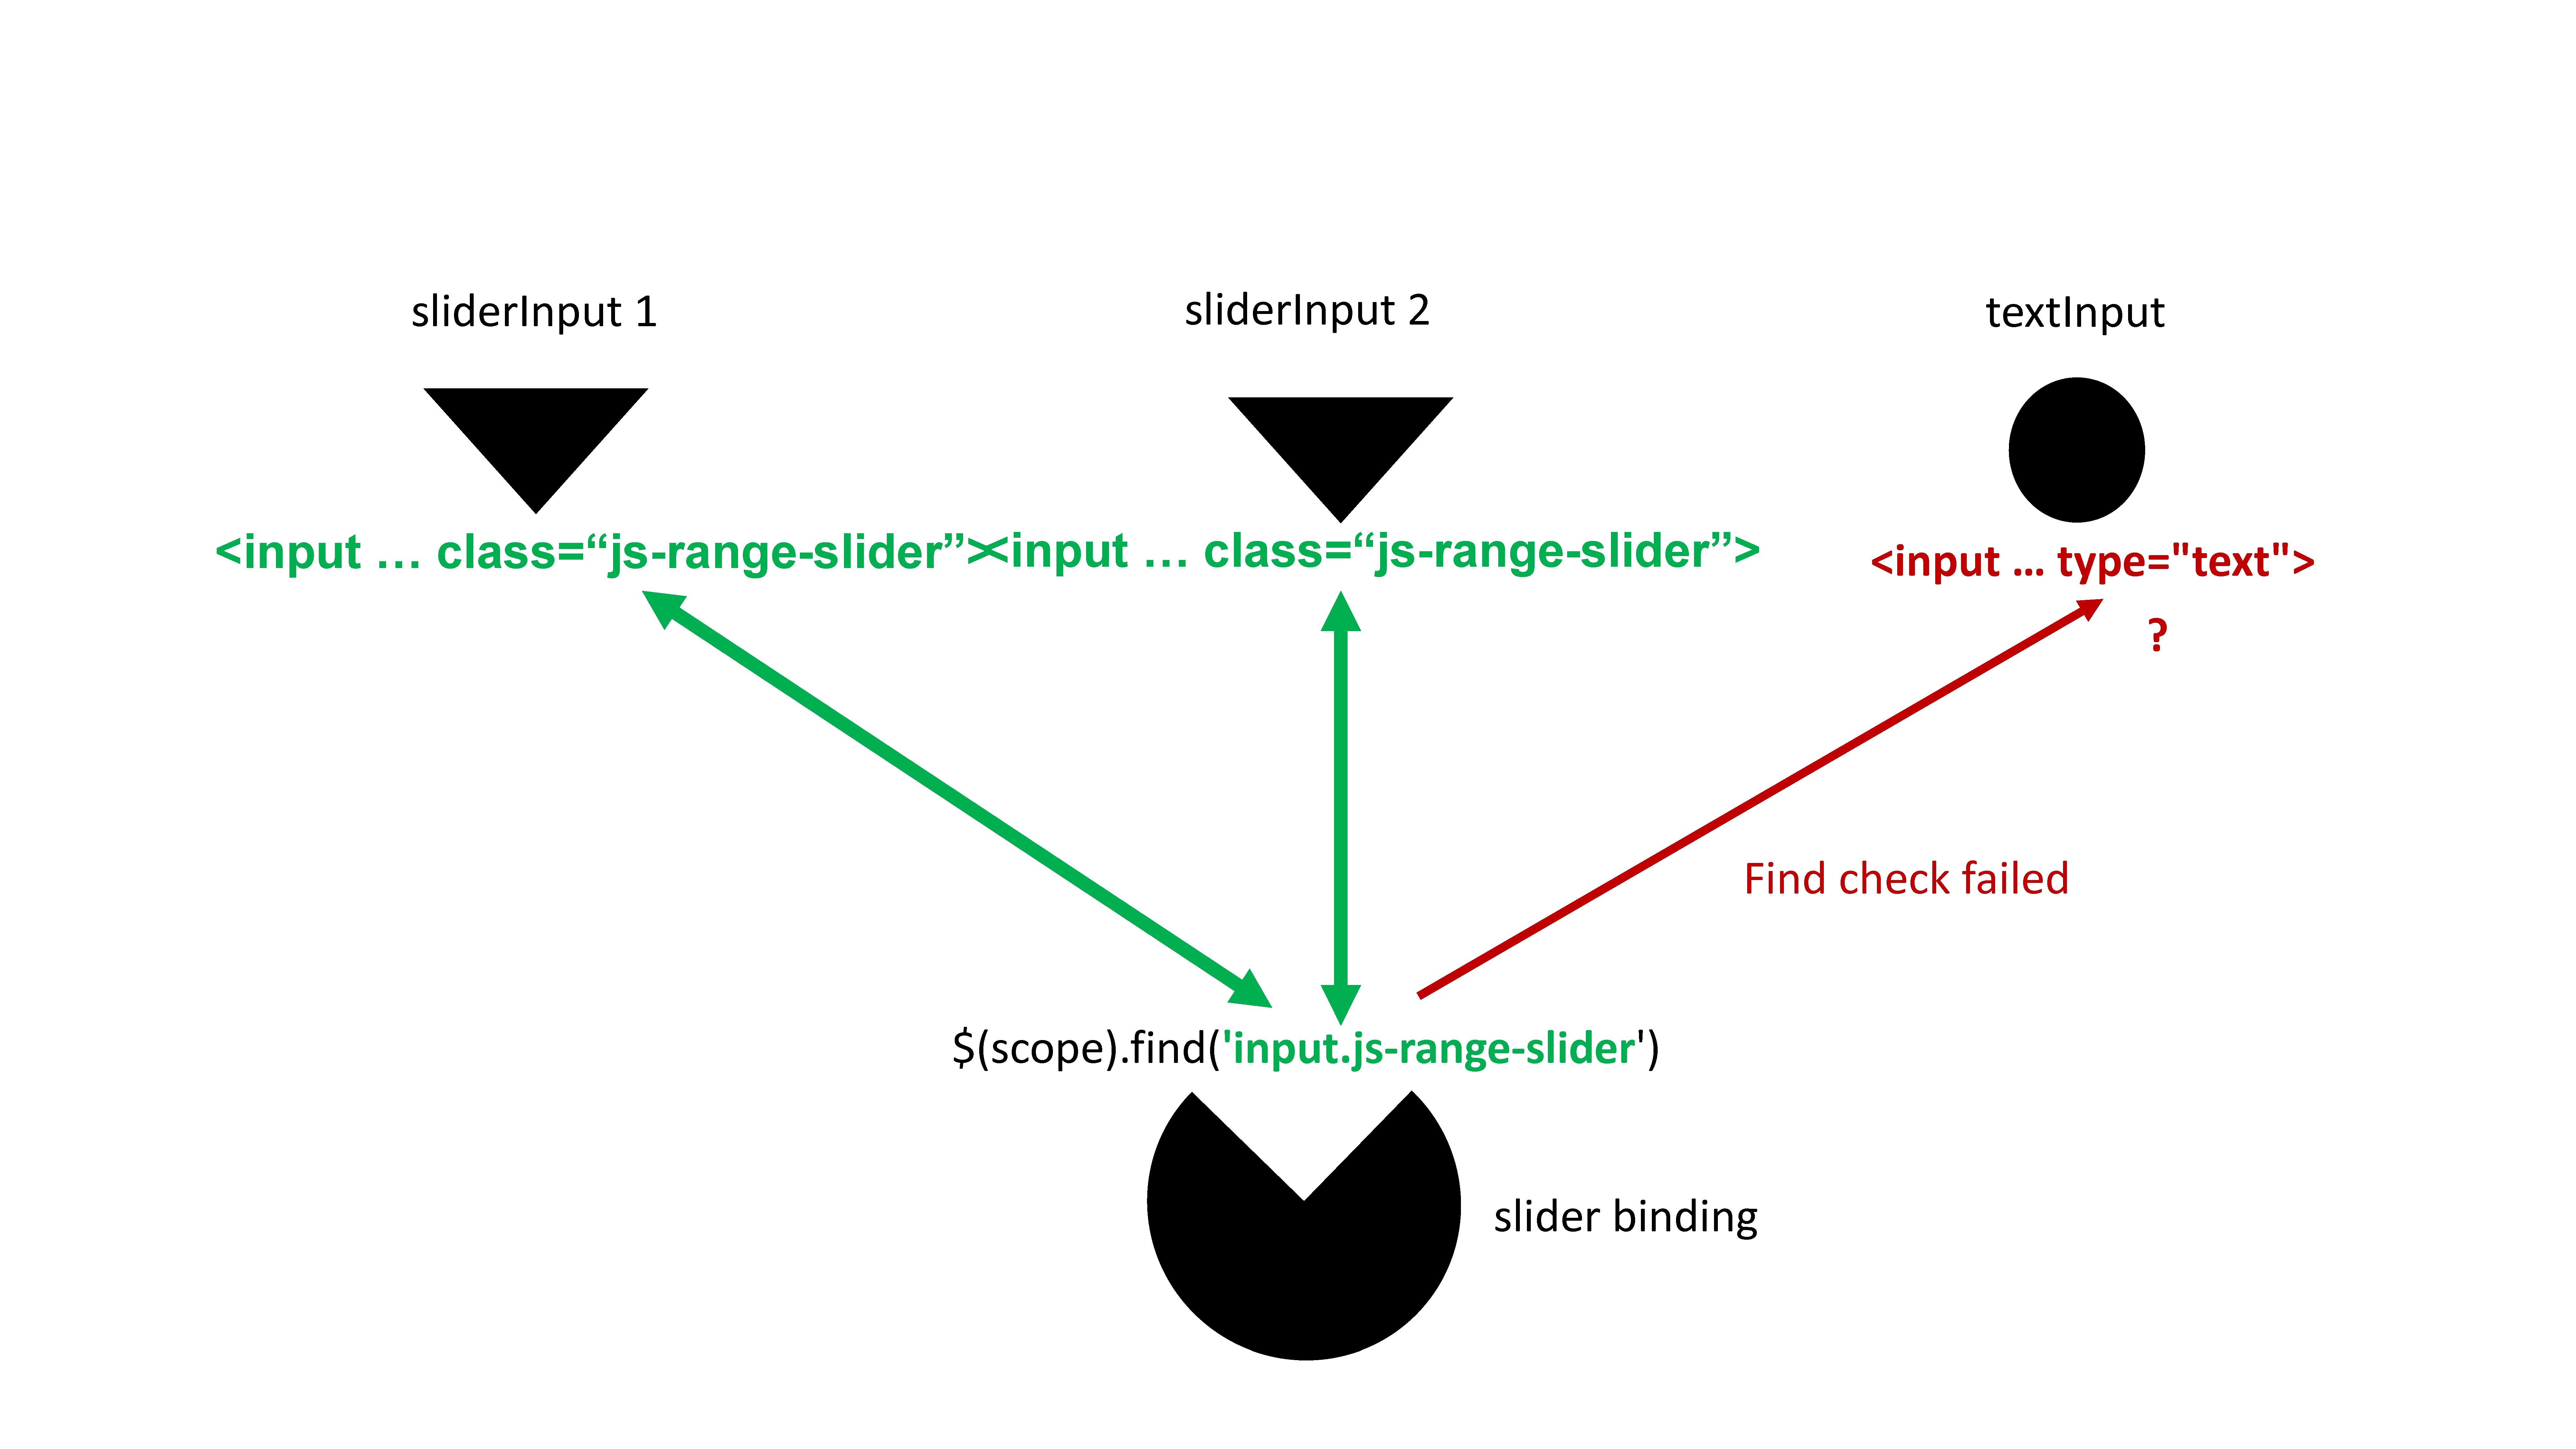
B.2.4 The binding steps: set and update

setValue(el, value) is used to set the input value. It called within receiveMessage(el, data), which is the JS part of all the R updateInput functions.

setValue: function(el, value) {
$(el).val(value);
}
receiveMessage: function(el, data) {
console.log(data);
if (data.hasOwnProperty('value')) {
this.setValue(el, data.value);
}
// other parameters to update...
}

Run the following and open the HTML inspector. Why doesn't the output value change?

updateCustomTextInputExample(3)

42 / 78

B.2.5 The binding steps: subscribe

subscribe(el, callback) listens to events defining Shiny to update the input value and make it available in the app. For a text input, we might have:

subscribe: function(el, callback) {
// when updated
$(el).on('change.customTextBinding', function(event) {
callback(false);
});
// keyboard, copy and paste, ...
$(el).on('keyup.customTextBinding input.customTextBinding', function(event) {
callback(true);
});
}

Run the following demonstration.

updateCustomTextInputExample(4)
updateCustomTextInputExample(5)

callback() tells to update the input on the server (R). If true, a rate policy is applied!

43 / 78

B.2.6 The binding steps: rate policies

As mentioned before, callback(true) will set rate policy for the given event listener. Setting a rate policy is relevant when we donโ€™t want to flood the server with tons of update requests.

getRatePolicy: function() {
return {
// Can be 'debounce' or 'throttle'
policy: 'debounce',
delay: 500
};
}

Below, the text input only updates after releasing the keyboard for 250ms.

updateCustomTextInputExample(6)
44 / 78

B.2.7 The binding steps: Recap

45 / 78

B.3 Box on Steroids!

Boxes are a center element of {shinydashboard}. Yet the latter only exploit 10% of their capability. Your mission: unleash the AdminLTE API to deliver box on steroids! Open box_on_steroids.Rmd.

20:00
46 / 78

Part 3. Custom Outputs

47 / 78

A.1 Structure

A brief plan of this part of the workshop

Serve data as an HTTP response and read it in JavaScript to produce an HTML output.๐Ÿ˜ฎ

  1. Discover HTTP 1.1 ๐ŸŒ.
  2. Learn to serve HTTP 1.1 in shiny
  3. Exercise in Unleash-Shiny-Exercises-Part-3 RStudio Cloud.
  4. Discover shiny outputs โžก๏ธ
  5. Exercise in Unleash-Shiny-Exercises-Part-3 RStudio Cloud.
  6. Q&A โ“

Have Unleash-Shiny-Exercises-Part-3 ready, it will come in handy.

48 / 78

A.1 Multi page applications ๐Ÿ“ƒ ๐Ÿ“ƒ ๐Ÿ“„

"Traditional" applications and websites

%0 s Server c Client s->c response c1 Client s->c1 response c->s request c1->s request

HTTP 1.1

A new page is requested

  • Client requests /, server responds
  • Client requests /about, server gives a different response
  • Client requests /products, server gives a yet a different response
  • and so on

    ๐Ÿ’ก Think {plumber}

49 / 78

A.1.1 Single page applications ๐Ÿ“ƒ

A more recent web development.

%0 s Server c1 Client c1->s messages c2 Client c2->s messages c3 Client c3->s messages

Websocket

Bi-directional communication

  1. Client connects
  2. Client sends message
  3. Server (may) respond with another message
  4. Back to point 2
50 / 78

A.1.2 What about shiny?

So which one of those does shiny use?

Both!

But one (probably) more than the other...

When you visit a shiny app:

  1. Your browser makes an HTTP request to the shiny server which responds with the initial ui.
  2. All subsequent communication is done via websocket (input, output).

No other /page is ever visited in shiny

51 / 78

A.1.2 HTTP response Headers

HTTP header ~ meta data: gives necessary information to the browser.

Importantly:

  • Status - How is the response?
    • 404 not found
    • 200 all good
    • 500 server-side error
    • 301 redirect
  • Content-Type - type of content ('text/html', 'application/json', etc.)
  • Content - content to render

These are all standardized, we don't get to choose.

A websocket sends binary data so there is no need for headers.

52 / 78

A.1.3 HTTP response

Let's discover how to serve an HTTP response with registerDataObj.

path <- session$registerDataObj(
name,
data,
filterFunc
)

Arguments

  1. name: the name of the path
  2. data: data objects of use in filterFunc
  3. filterFunc: Function, accepts data and request

Let's break this down

53 / 78

A.1.3.1 HTTP response name & path

path <- session$registerDataObj(name = "about", data, filterFunc)

Since the response if only valid for a single session the path returned is dynamically generated.

Example paths for different sessions:

  1. session/0a6ed2556d97dcaa1ddeb615dc04cd1e/dataobj/about
  2. session/259b8dc2f18ffc975b246d206b60073f/dataobj/about
  3. session/72abd5a5da9a1651bee32d25a908a0cd/dataobj/about


What is this path anywayโ“

It's where the HTTP response is servedโ—

54 / 78

A.1.3.2 HTTP response filterFunc & data

path <- session$registerDataObj(name = "about", data = "<h1>Hello!</h1>", filterFunc)

The core of it all: it actually serves the HTTP response.

# filterFunc
function(data, req){
shiny:::httpResponse(
status = 200, # default
content_type = "text/html", # default
content = data
)
}

Note: httpResponse is not exported, hence the :::

55 / 78

A.1.3.3 HTTP response HTML

By default httpResponse returns a HTML.

path <- session$registerDataObj(
name = "hello",
data = "<h1>Hello there!</h1>",
function(data, req) {
shiny:::httpResponse(
content = data
)
}
)

56 / 78

A.1.3.4 HTTP response JSON

Minor changes to return JSON data.

path <- session$registerDataObj(
name = "cars-data",
data = cars,
function(data, req) {
# seralise to JSON
res <- jsonlite::toJSON(data)
shiny:::httpResponse(
content_type = "application/json",
content = res
)
}
)
[
{
"speed": 4,
"dist": 2
},
{
"speed": 4,
"dist": 10
}
]
57 / 78

B.1 Master HTTP

Open and complete http-excercise.Rmd.

10:00
58 / 78

B.2 ๐Ÿ’ก The grand idea

Serve data with an HTTP response, read it with JavaScript to produce the HTML output

%0 cluster_1 Done! cluster_2 Custom output server Server json JSON server->json response javascript JavaScript json->javascript fetch html HTML output javascript->html
59 / 78

B.3 Level Layout

Meet "box" our soon-to-be custom output โ—

๐Ÿ”— bulma.io/documentation/layout/level

60 / 78

B.4 Outputs

Examples:

  • plot
  • plotOutput
  • renderPlot
  • datatable
  • datatableOutput
  • renderDatatable
  • table
  • tableOutput
  • renderTable
  • plotly
  • plotlyOutput
  • renderPlotly

Our 3 functions:

  1. box - captures the data
  2. boxOutput - places the output HTML
  3. renderBox - serves the data as JSON
61 / 78

B.4.2 Level box.Rd


Box

The box function.

Usage

box(data, title, value)

Value

Returns a data.frame


Example of data to produce the above.

title value
tweets 3456
following 123
followers 456000
likes 789
62 / 78

B.4.5 Level boxOutput.Rd


boxOutput

The boxOutput function to place in the shiny UI.

Usage

boxOutput(id)

Value

Returns a <nav> tag bearing input id


Example

boxOutput("myBox")
<nav id="myBox" class="level box">
<!-- Level items -->
</nav>
63 / 78

B.4.7 Level renderBox.Rd


renderBox

Render box in shiny.

Usage

renderBox(expr)

Value

Returns a function

Preprocesses the output of box and sends that data to the client.

โ—Whatโ“

  1. It accepts an expression
  2. It returns a function

๐Ÿ˜จ ๐Ÿ˜จ ๐Ÿ˜ฑ

64 / 78

B.4.8 Level renderBox.R (1)

Internally all render* functions return another function()โ—

It's a function! ๐ŸŽ‰

shiny::exprToFunction({
head(cars, 10)
})
## function ()
## {
## head(cars, 10)
## }

We can run it ๐ŸŽ‰

fn <- shiny::exprToFunction({
x <- 1
x + 3
})
fn()
## [1] 4

Shiny = Reactivity: functions are easier to rerun

output$something <- you actually assign a function โ—

65 / 78

B.4.9 Level renderBox.R (2)

Great, render* returns a function, but what about that one then ๐Ÿ˜•

renderSomething <- function(expr){
func <- shiny::exprToFunction(expr)
# assigned to `output`
function(){
data <- func()
# sent to the JavaScript binding
return(data + 1)
}
}

The result of render* is a function, the result of which is sent to the JavaScript binding ๐Ÿ’ก

66 / 78

B.1 Make Box!

Open and complete custom-output.Rmd.

15:00
67 / 78

B.4.12 Level binding

Much of the JavaScript works just like inputs, only simpler!

Only two methods:

  1. ๐Ÿ”Ž find - does the same as for inputs.
  2. โžก๏ธ renderValue - renders the output.
68 / 78

B.4.13 Level skeleton

Eerily similar to inputs: 1) initialise, 2) extend, 3) register.

var boxBinding = new Shiny.OutputBinding();
$.extend(boxBinding, {
find: function(scope) {
return $(scope).find(".box");
},
renderValue: function(el, data) {
// Get the serialised JSON
// Use it to render content
}
});
Shiny.outputBindings.register(boxBinding, "pharma.box");
69 / 78

B.4.14 Level renderValue

The renderValue in the JavaScript binding the following:

function(el, data) {
// httr::GET (1)
fetch(data)
// httr::content (2)
.then(response => response.json())
// lapply | purrr::map (3)
.then(data => {
data.map((row)=>{
let div = createElement(row);
$(el).append(div);
})
})
}

Args

  • el the element (boxOutput)
  • data the path sent by renderBox

Logic

  1. Fetch the data
  2. Extract JSON from response
  3. Loop over data
    1. Create level-item
    2. Append to <nav>
70 / 78

C.1 Where to go from here

Numerous improvements could be made.

  • The box function could accept a model and extract relevant statistics
  • The output could use other JavaScript libraries to animate the numbers for instance
  • Or the value could be colored dependening on a threshold
  • Add methods so box accepts different kinds of objects (e.g.: xts)
  • Add an inline chart

Plenty more can be done!

71 / 78

Part 4. Shiny's Hidden Gems

72 / 78

How to get the last changed input?

ui <- fluidPage(
textInput('txt_a', 'Input Text A'),
textInput('txt_b', 'Input Text B'),
uiOutput('txt_c_out'),
verbatimTextOutput("show_last")
)
server <- function(input, output, session) {
output$txt_c_out <- renderUI(textInput('txt_c', 'Input Text C'))
values <- reactiveValues(lastUpdated = NULL)
observe({
lapply(names(input), function(x) {
observe({
input[[x]]
values$lastUpdated <- x
})
})
})
output$show_last <- renderPrint(values$lastUpdated)
}

We leverage Shiny.setInputValue and Shiny JS events. shiny:inputchanged fires each time an input is changed!

$(document).on('shiny:inputchanged', function(event) {
Shiny.setInputValue('pleaseStayHome', {name: event.name, value: event.value, type: event.binding.name.split('.')[1]});
});

On the R side, we listen to input$pleaseStayHome. That's it!

The {shinylogs} package developed by dreamRs contains this feature:

shinyApp(
ui = fluidPage(
numericInput("n", "n", 1),
sliderInput("s", "s", min = 0, max = 10, value = 5),
verbatimTextOutput("lastChanged")
),
server = function(input, output, session) {
# specific to shinylogs
track_usage(storage_mode = store_null())
output$lastChanged <- renderPrint(input$`.shinylogs_lastInput`)
}
)
73 / 78

How to send notifications from JS?

Don't forget that Shiny is a JS object having the notifications.show method! We add onclick to an actionButton.

ui <- fluidPage(
actionButton(
"notif",
"Show notification",
onclick = "Shiny.notifications.show({
html: '<strong>Oups</strong>',
type: 'error',
duration: 2000
});"
)
)
server <- function(input, output, session) {}
shinyApp(ui, server)
74 / 78

Update inputs from JS (not R)?

Open update_input_from_client.Rmd.

75 / 78

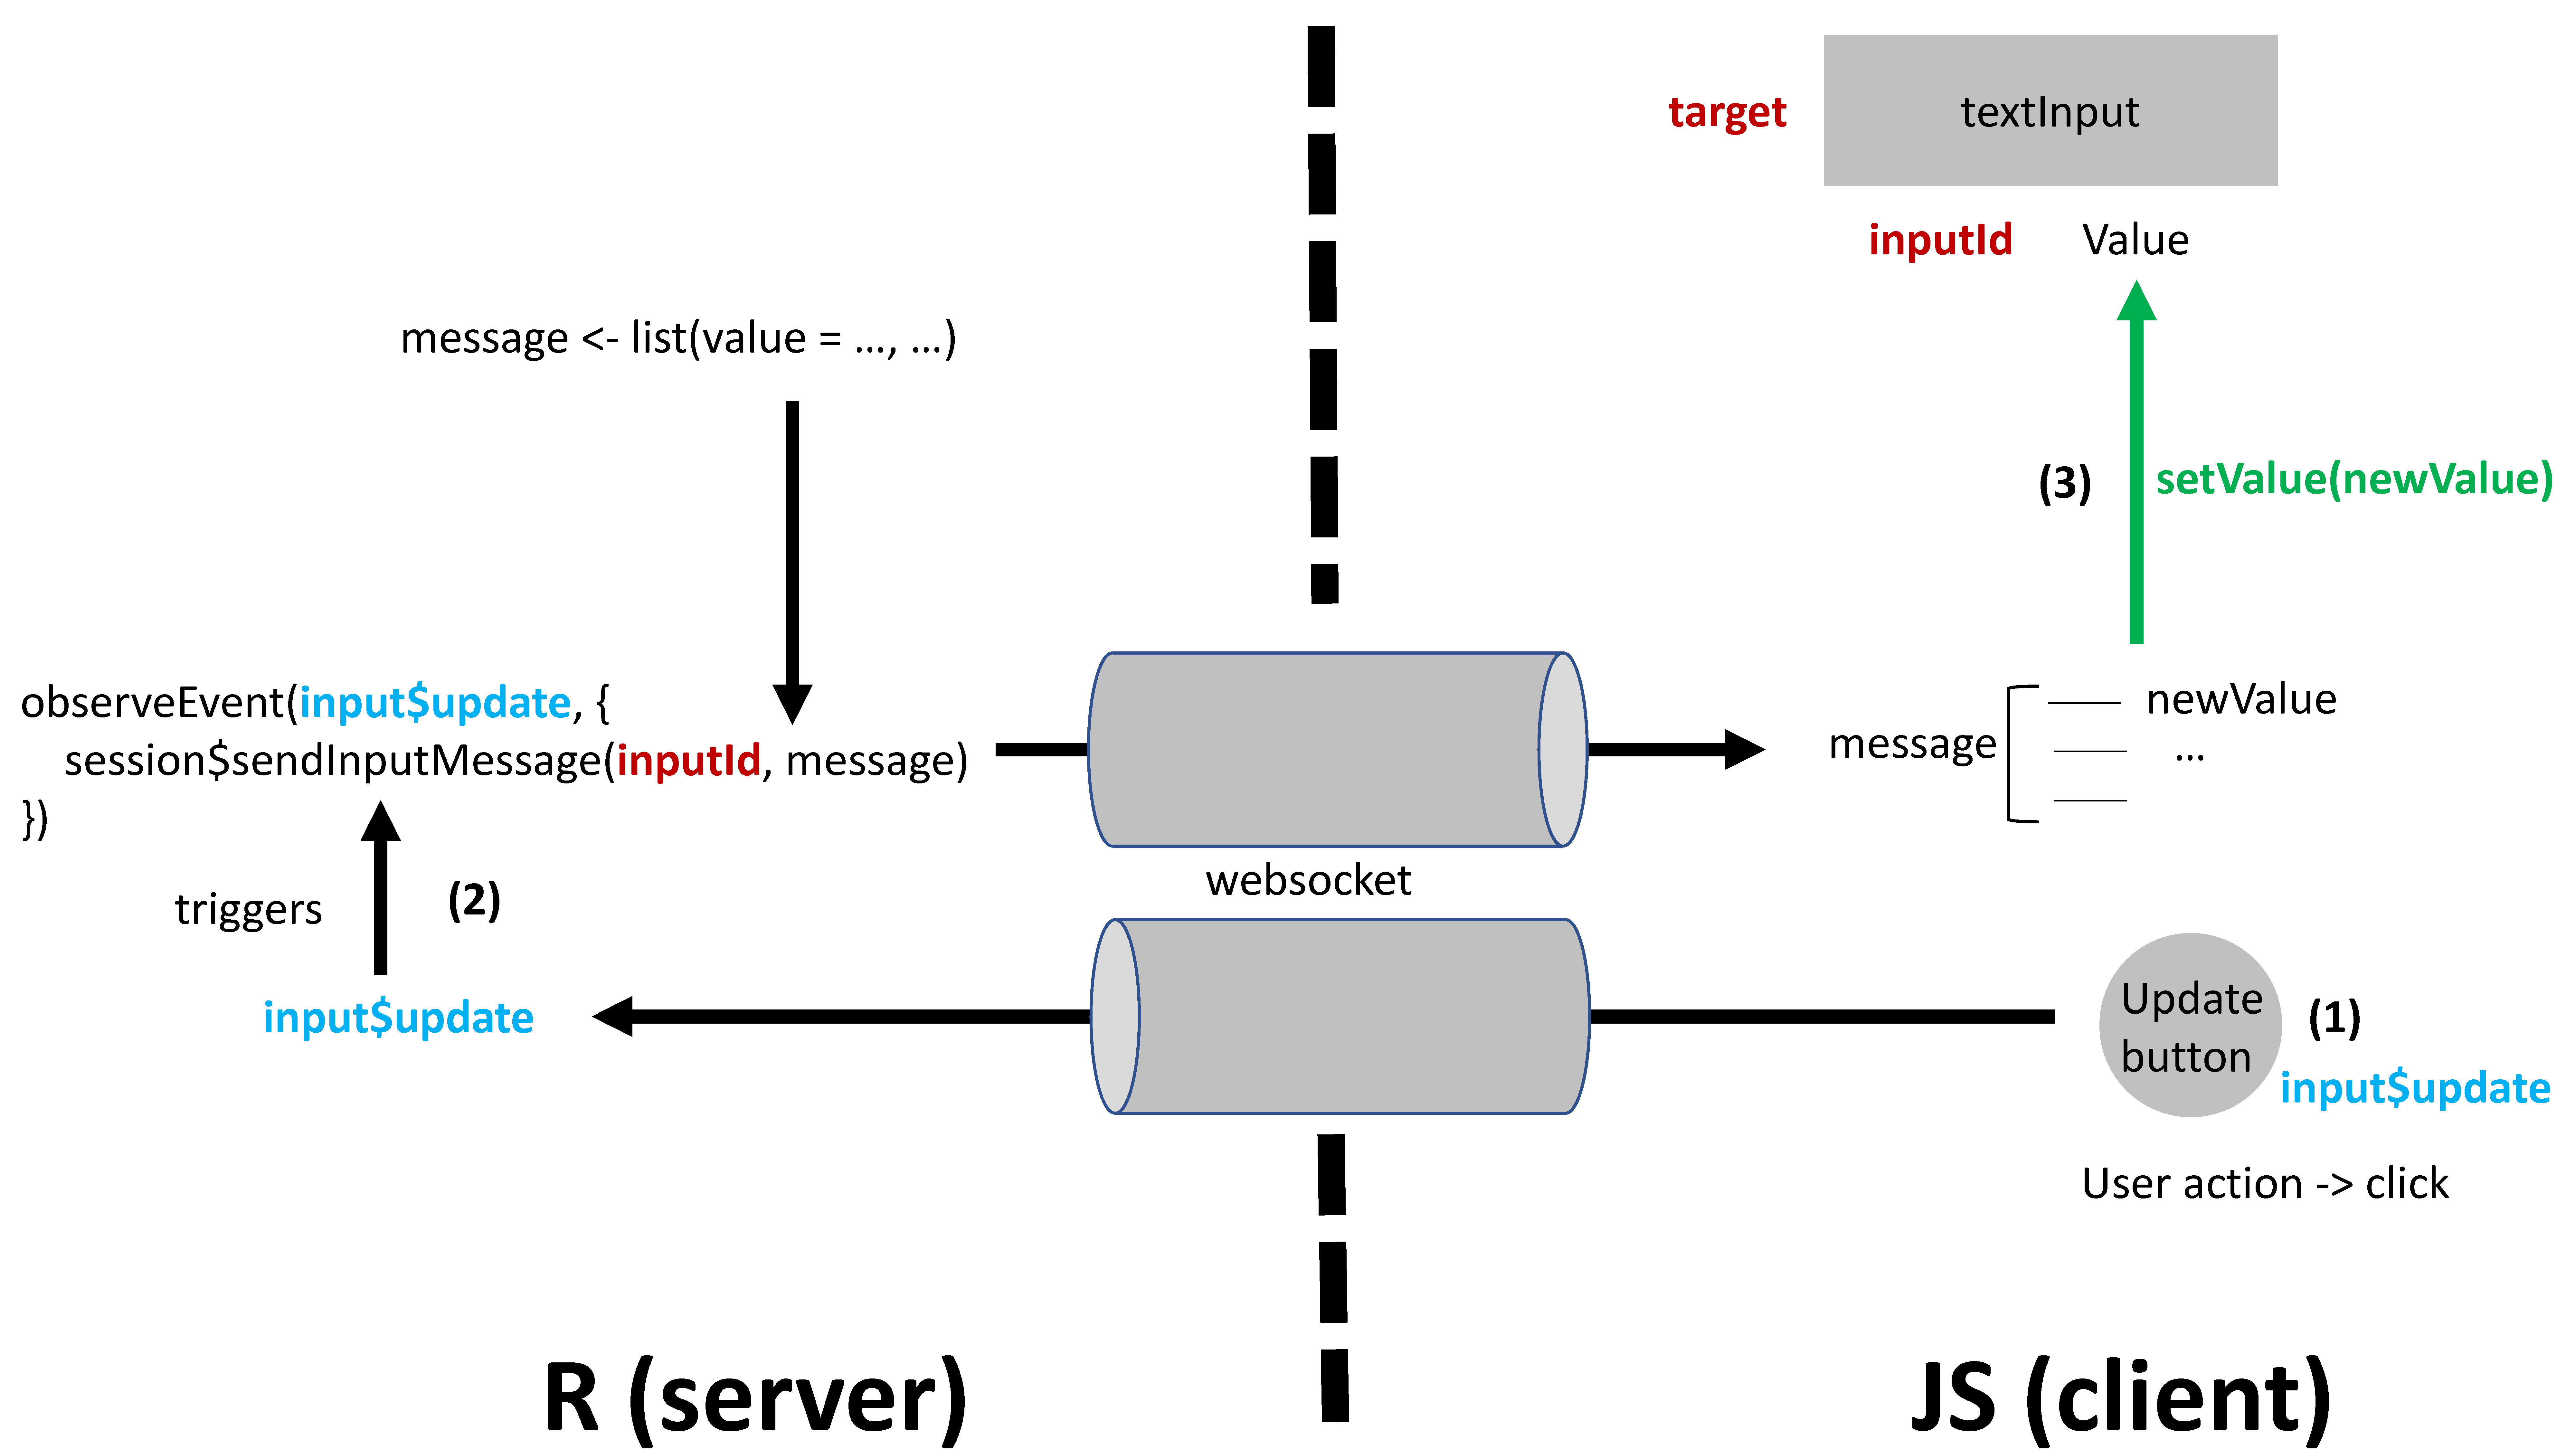
How to hijack a binding?

Case study: we would like to modify the action button behavior on the fly.

Steps:

  1. Wait for the shiny:connected event
  2. Unbind all inputs
  3. Access the Shiny.inputBindings registry
  4. Extend the binding
  5. Apply the new changes with bindAll
$(function() {
$(document).on('shiny:connected', function(event) {
Shiny.unbindAll();
$.extend(Shiny
.inputBindings
.bindingNames['shiny.actionButtonInput']
.binding, {
// do whathever you want to edit existing methods
});
Shiny.bindAll();
});
});
76 / 78

How to interact with a binding from JS?

What if you don't want to update input from the server? ๐Ÿคท

  • Define the trigger
  • Define the target
  • Capture the target input binding
  • Use setValue to add new value
  • Trigger any relevant event mentioned in subscribe (tells Shiny to update from the R side)
$(function() {
// each time we click on #test (a button)
$('#test').on('click', function() {
var $obj = $('#button');
var inputBinding = $obj.data('shiny-input-binding');
var val = $obj.data('val') || 0;
inputBinding.setValue($obj, val + 10);
$obj.trigger('click');
});
});
77 / 78

To be continued ... Thanks !!!

78 / 78

About us

David

Data Scientist at Novartis

@divadnojnarg

John

Data scientist at the World Economic Forum

@jdatap

Colin

Shiny Expert at ThinkR

@_ColinFay

2 / 78
Paused

Help

Keyboard shortcuts

โ†‘, โ†, Pg Up, k Go to previous slide
โ†“, โ†’, Pg Dn, Space, j Go to next slide
Home Go to first slide
End Go to last slide
Number + Return Go to specific slide
b / m / f Toggle blackout / mirrored / fullscreen mode
c Clone slideshow
p Toggle presenter mode
t Restart the presentation timer
?, h Toggle this help
oTile View: Overview of Slides
Esc Back to slideshow