Program
We're in for 4 hours of fun!
- Grab a ☕
- Make yourself comfortable 🛋 or 🧘
- Ask questions ❓
- Intro + Quiz (5 min)
- Develop custom templates with Shiny (45 min)
- ☕ + ❓ (10 min) (total: 1h)
- Unleash Shiny's interactivity (80 min)
- ☕ + ❓ (10 min) (total: 2h30)
- Innovative approach to custom outputs (60 min)
- ☕ + ❓ (10 min) (total: 3h40)
- Shiny's hidden or less documented features (20 min) (total: 4h)
Disclaimer: this workshop is not about building Shiny Apps!!!
Workshop Material
- Slides: https://rinterface.com/shiny/talks/RPharma2020/#1
- For a plug and play experience, we created a Rstudio Cloud project with everything installed for you
- To avoid connection issues, disconnect from your VPN!
- Somes slides contain code that you may run (a sandbox space is available in RStudio Cloud)

Introduction
Part 1. Custom Templates with Shiny
A.1.1 Introduction to HTML: tags
The simplest HTML skeleton
<!DOCTYPE HTML><html> <head> <!-- head content here --> </head> <body> <!-- body content here --> </body></html>There are 2 types of tags:
- paired-tags:
<div></div> - self closing tags:
<img/>
We classify them by usage:
- structural tags:
<head></head>,<body></body> - control tags:
<script></script>,<button></button> - formatting tags:
<font></font>
Block vs inline:
<div><p>Hello World</p></div>: Good<span><div><p>Hello World</p></div></span>: not good
A.1.2 Introduction to HTML: attributes
Attributes specify the tags properties
<div class="awesome-item" id="myitem"></div><!-- the class awesome-item may be applied to multiple tags --><span class="awesome-item"></span>The most common attributes:
- class may be shared between multiple tags
- id is unique
- non standards attributes like
data-toggle
Attributes are used by CSS and JavaScript to interact with the web page!
A.2 About the Document Object Model
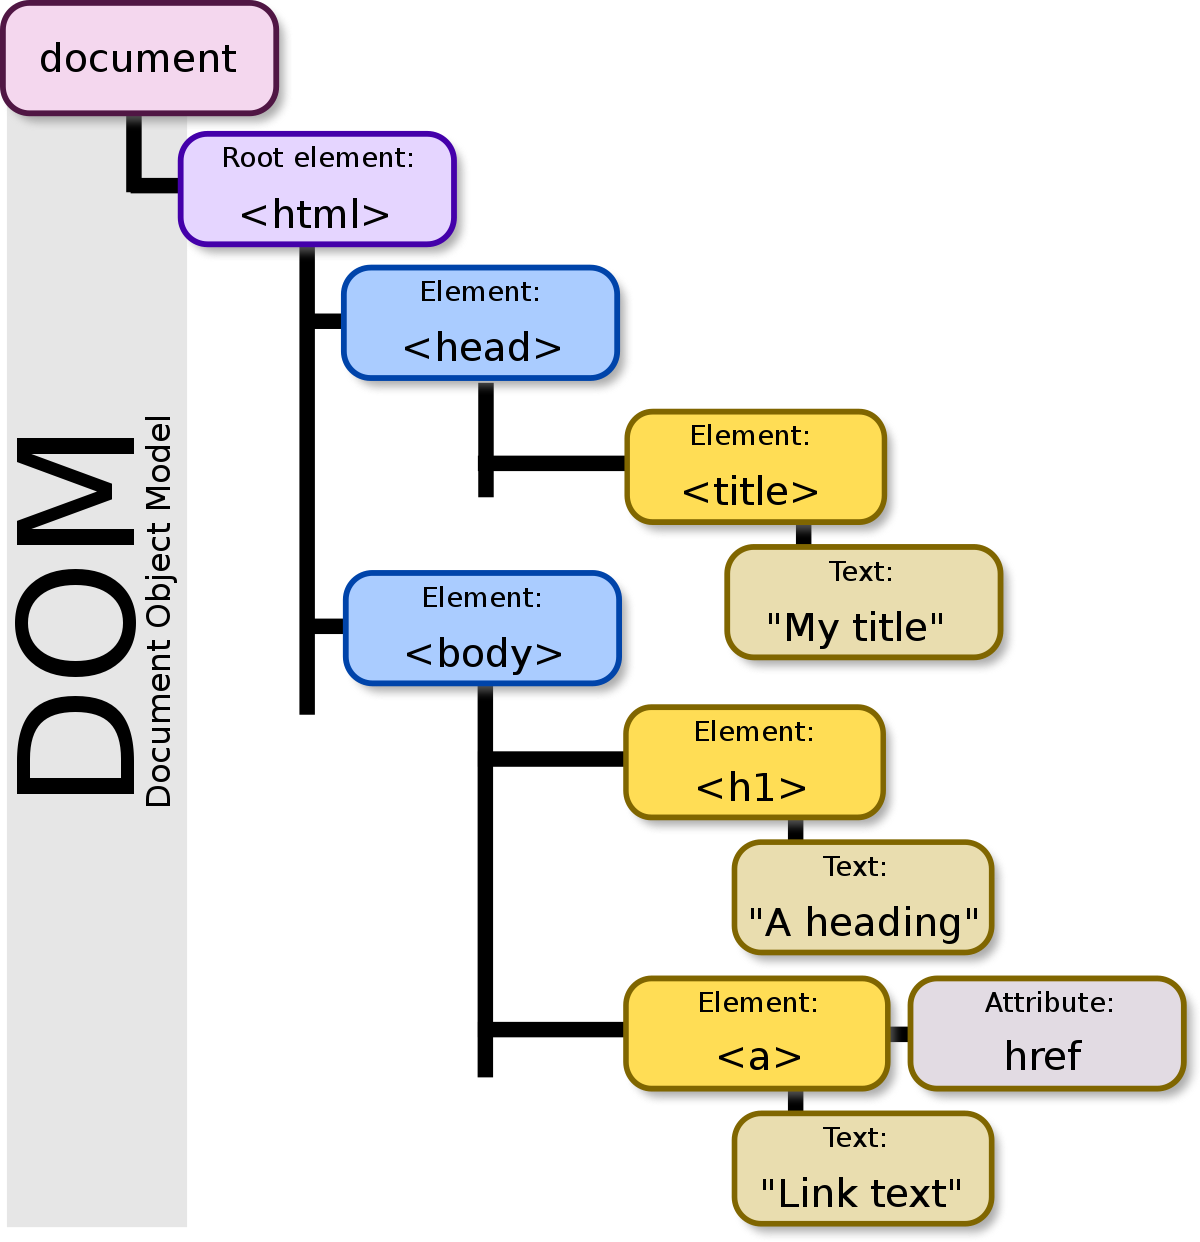
DOM is a convenient representation (tree) of the HTML document. We inspect the code of any web page with Firefox or Chrome:
- after a right click and selecting inspect
- after clicking on F12 (windows), fn + F12 (Mac)
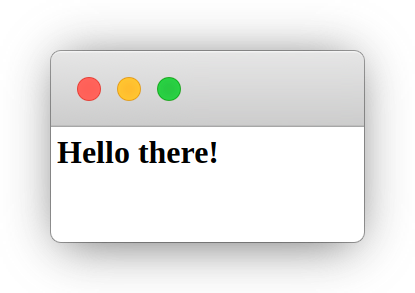
library(shiny)ui <- fluidPage(p("Hello World"))server <- function(input, output) {}shinyApp(ui, server)- Run the above app, right click on the only text element and select inspect
- In the
Elementspanel, double click between the<p></p>tag to edit the current text. Press enter when finished
B. Unleash {htmltools}
{htmltools} is a R package designed to:
- Generate HTML tags from R
- Handle web dependencies: add, remove, resolve, ...
Historically, {htmltools} was extracted out of {shiny} to extend it. That's why, both packages have many common functions!
At the moment, {htmltools} does not have any user guide, although being an important package for all web things
C.1.1 Handle dependencies
How would you include JS/CSS in a Shiny app?
Works but not portable
fluidPage( tags$head( tags$style(...), tags$script(src = "path-to-script"), tags$script( "$(function() { // JS logic ... }); " ) ))With {htmltools}, we define the dependency with htmlDependency, then attach it to a tag with tagList:
use_bs4_dep <- function(tag) { bs4_dep <- htmlDependency( name = "Bootstrap 4", version = "1.0", src = c(href = "https://maxcdn.bootstrapcdn.com/bootstrap/4.0.0/css/"), stylesheet = "bootstrap.min.css" ) tagList(tag, bs4_dep)}use_bs4_dep(fluidPage())C.1.2 From HTML to R 🧙♂️
HTML VS R
In HTML, we have:
<div class="divclass" id = "daddy"> <h1>A child</h1> <span class="child" id="baby">Crying</span></div>The corresponding R code is
mytag <- div( class = "divclass", id = "daddy", h1("A child"), span(class = "child", id = "baby", "Crying"))Some tags like <nav></nav> need the tags$ prefix before (tags is a list of functions). The withTags function to use tags$<tagName>
C.1.3 Automate the conversion? 
This process is not interesting and time consuming!

Tools exist:
- html2R Shiny app converts HTML to R (thanks Alan Dipert)
{charpente}does the same from the R console withhtml_2_R
Code conversion by {charpente}
html_2_R('<div class="divclass" id = "daddy"></div>')## div(## class = "divclass",## id = "daddy"## )C.2.1 Accessing R tags attributes
How to access name, attributes, children?
We could use str(mytag) to inspect the structure of the R object.
mytag$attribs## $class## [1] "divclass"## ## $id## [1] "daddy"mytag$children## [[1]]## <h1>A child</h1>## ## [[2]]## <span class="child" id="baby">Crying</span>C.2.2 Manipulate R tags
Add new attributes
There are 2 methods:
tagAppendAttributes(tag, list of attributes)is preferredtag$attribs[["new-attribute"]] <- value
Add child/children
tagAppendChild(tag, child)tagAppendChildren(tag, list of children)
There exist other functions but we'll not use them.
D. Practice: bulma
In the following, you'll reconstruct the {shinybulma} package step by step!
Main tasks:
- Import bulma dependencies
- Generate the main
pagefunction
Lets' start! Open shinybulma.Rmd and enjoy 🐒
25:00
Part 2. Unleash Shiny's Interactivity
A.2 Shiny heavily relies on JavaScript (JS)
One very big shiny.js* responsible for:
- registering input/output
- handling every single input/output action
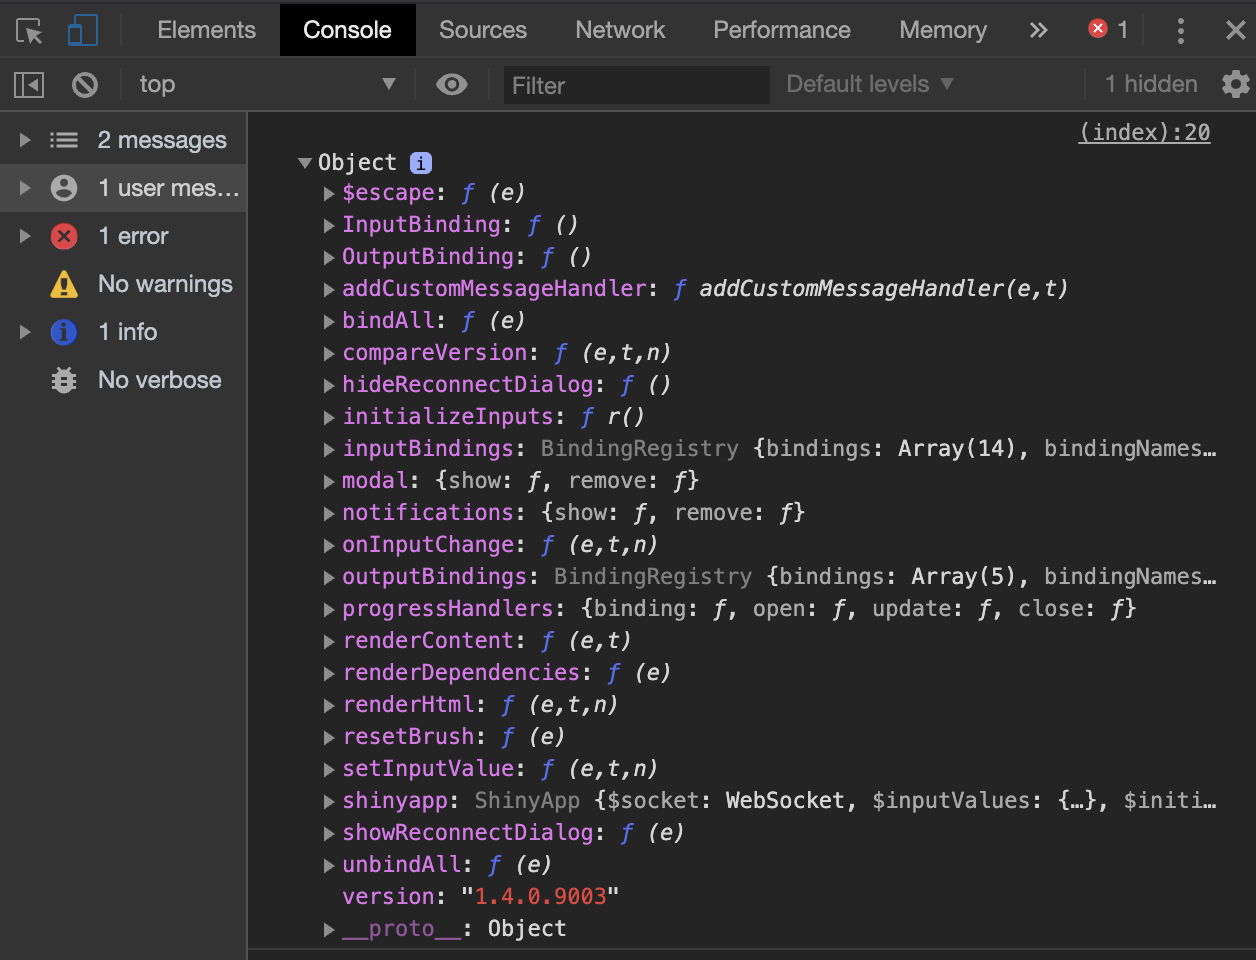
- initializing and controlling the websocket 🧦 (the whaaaat?)
- handling alerts/modals/notifications
- ...

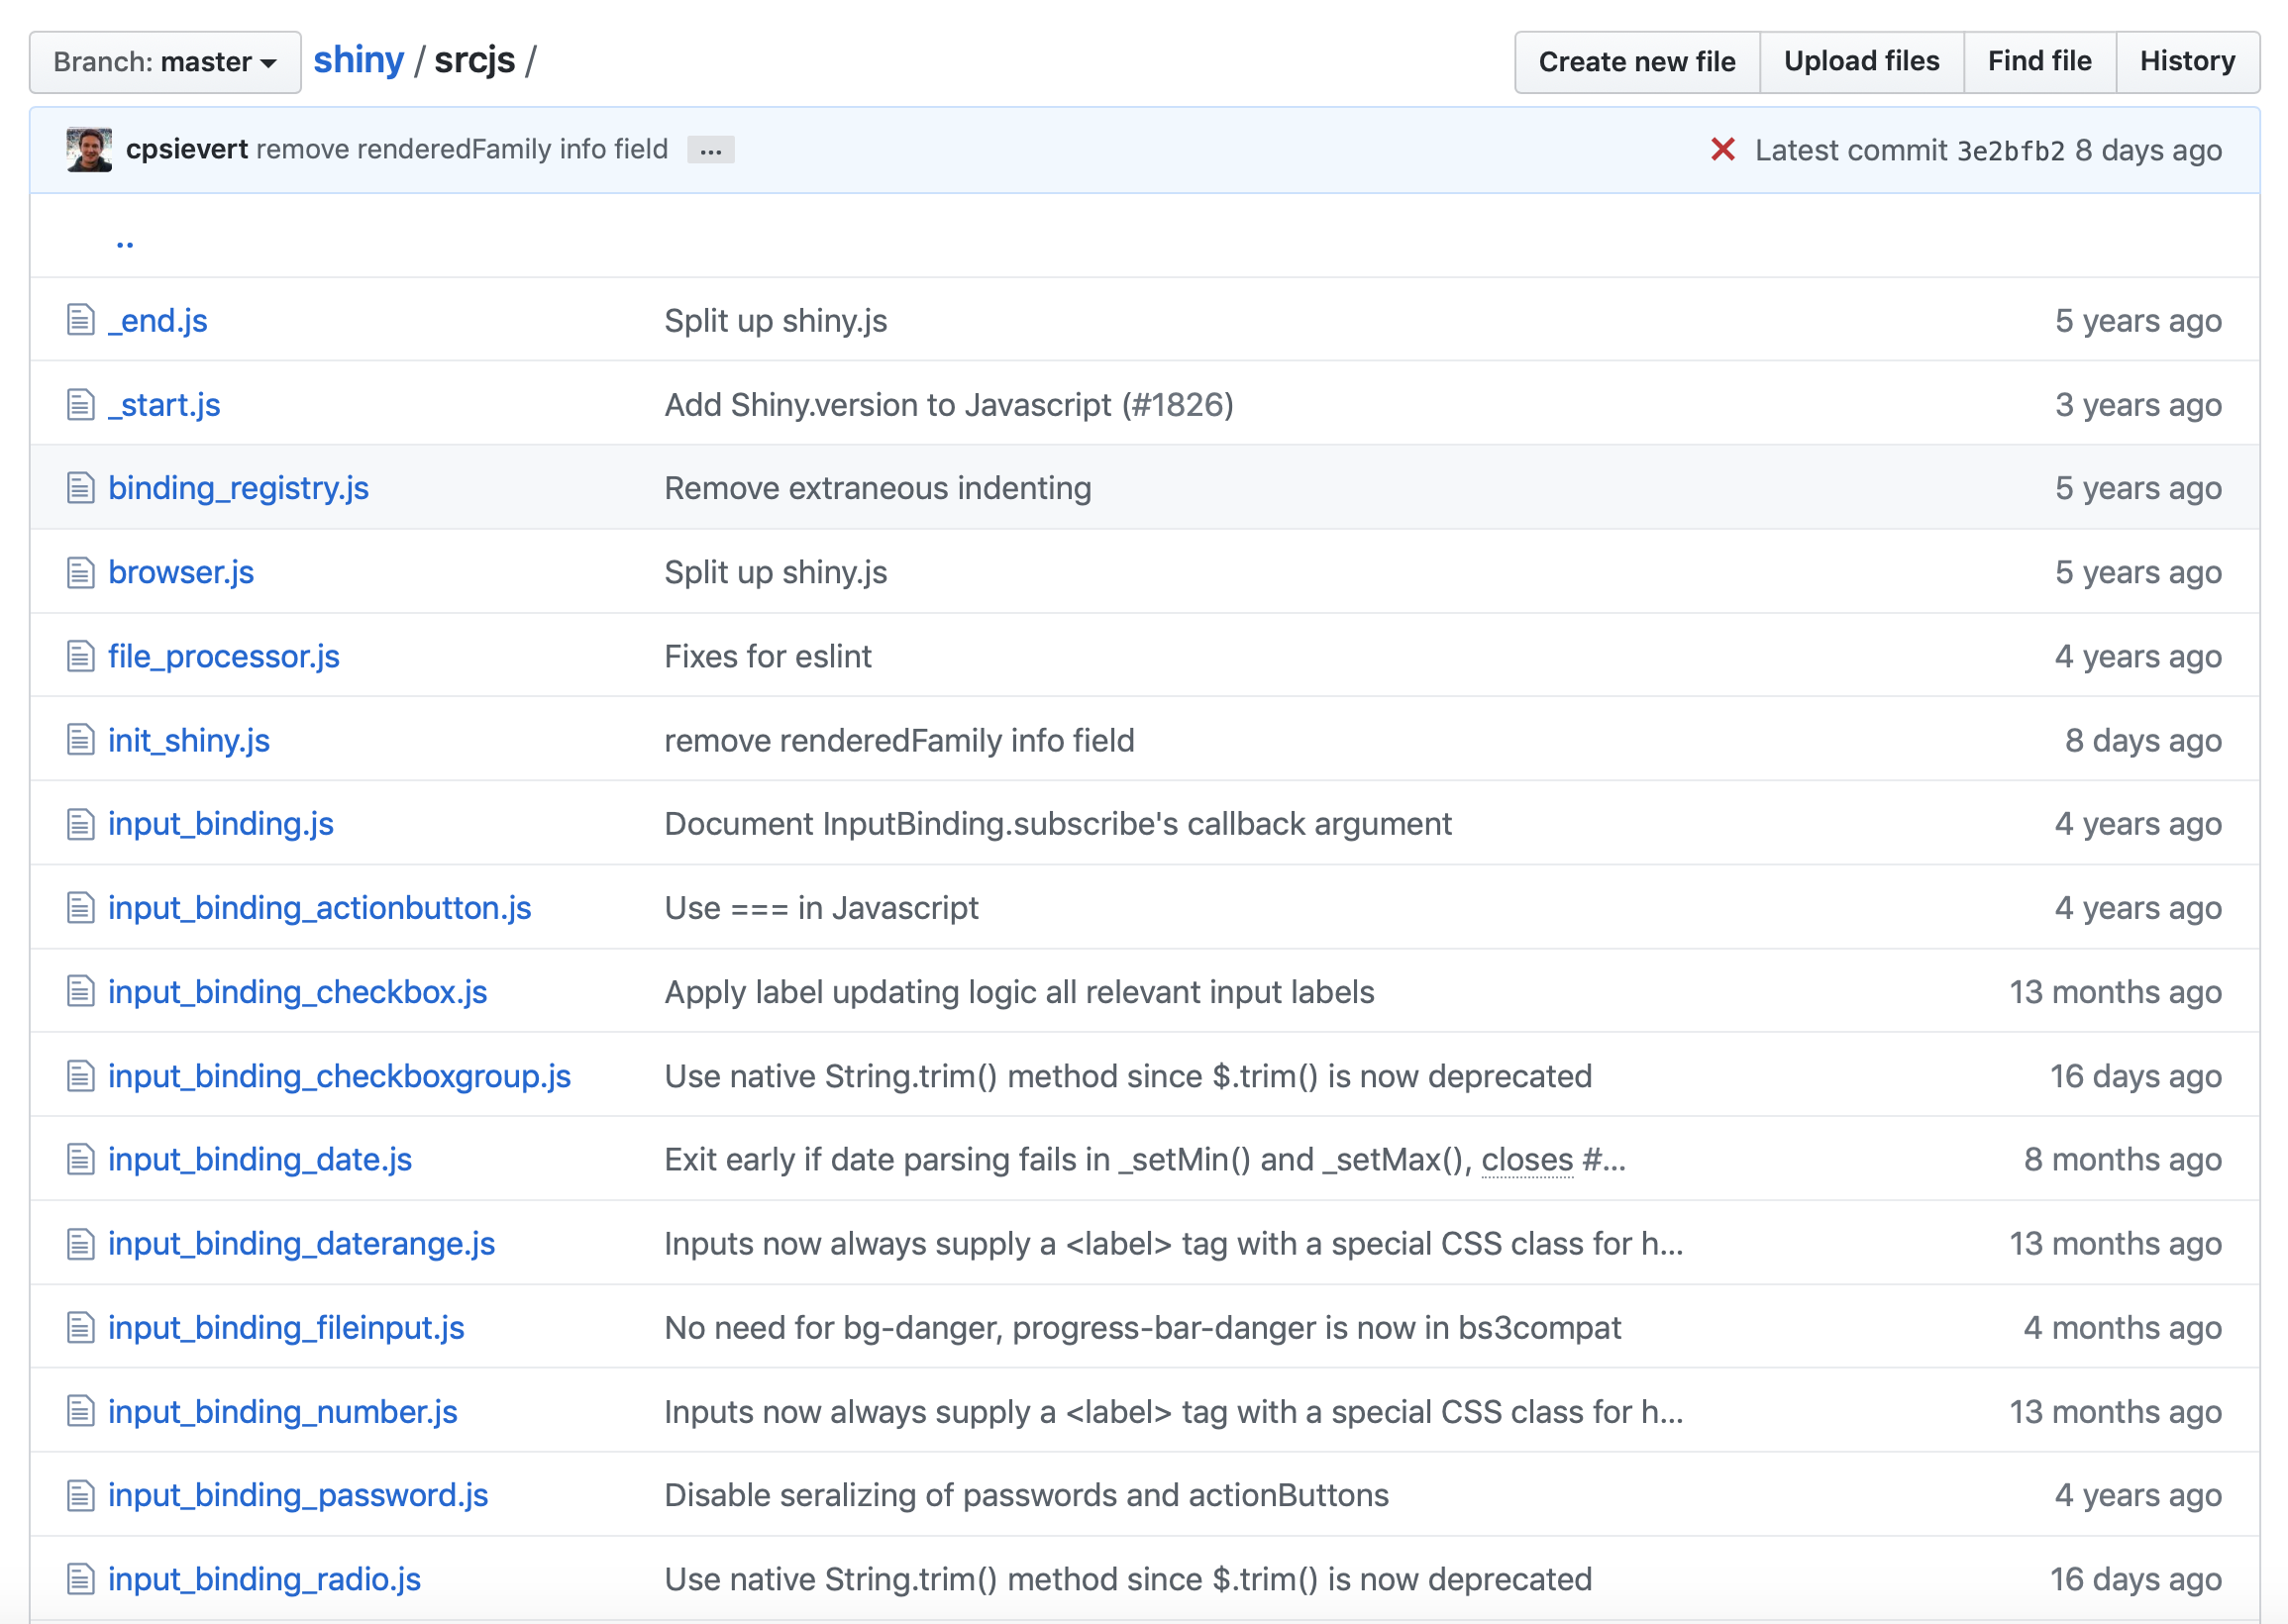
JS source may be found here. In short all these files are concatenated, giving shiny.js and *shiny.min.js!
A.2.1 Introduction to JS and jQuery
- Primary role: create dynamic and interactive pages
- How? Interact with the DOM elements (modify, remove, add)
- JS is run on the client (web browser)
- JS is object oriented
var myNumber = 1; // affectationmyNumber--; // decrementconsole.log(myNumber); // print 0const you = { name: 'your name', // property music : 'your favorite music', printName: function() { // method console.log(`I am ${this.name}`); // here "this" is the object }}you.geek = true; // add extra propertyA.2.4 jQuery and event listeners
An event listener is a program that triggers when a given event occurs, like after a mouse click.
<button id="mybutton">Go ! </button>With vanilla JS:
var btn = document.getElementById('mybutton'); // select the buttonbtn.addEventListener('click', function() { // action + consequences alert('You clicked me!'); // action});With jQuery:
$('#mybutton').on('click', function() { alert('You clicked me!');});Hopefully you are convinced that jQuery is less verbose than pure JS!
A.3.1 R and JS
Let's consider the following app
ui <- fluidPage( textInput("text", "My text", "Some text"), actionButton("update", "Update"))server <- function(input, output, session) { observeEvent(input$update, { updateTextInput(session, "text", value = "Updated text") })}shinyApp(ui, server)Waiiit!!
- How does JS knows that R wants to update the text value ❓
- How does Shiny knows when to send back the updated text to R ❓
A.3.3.2 Shiny and Websocket
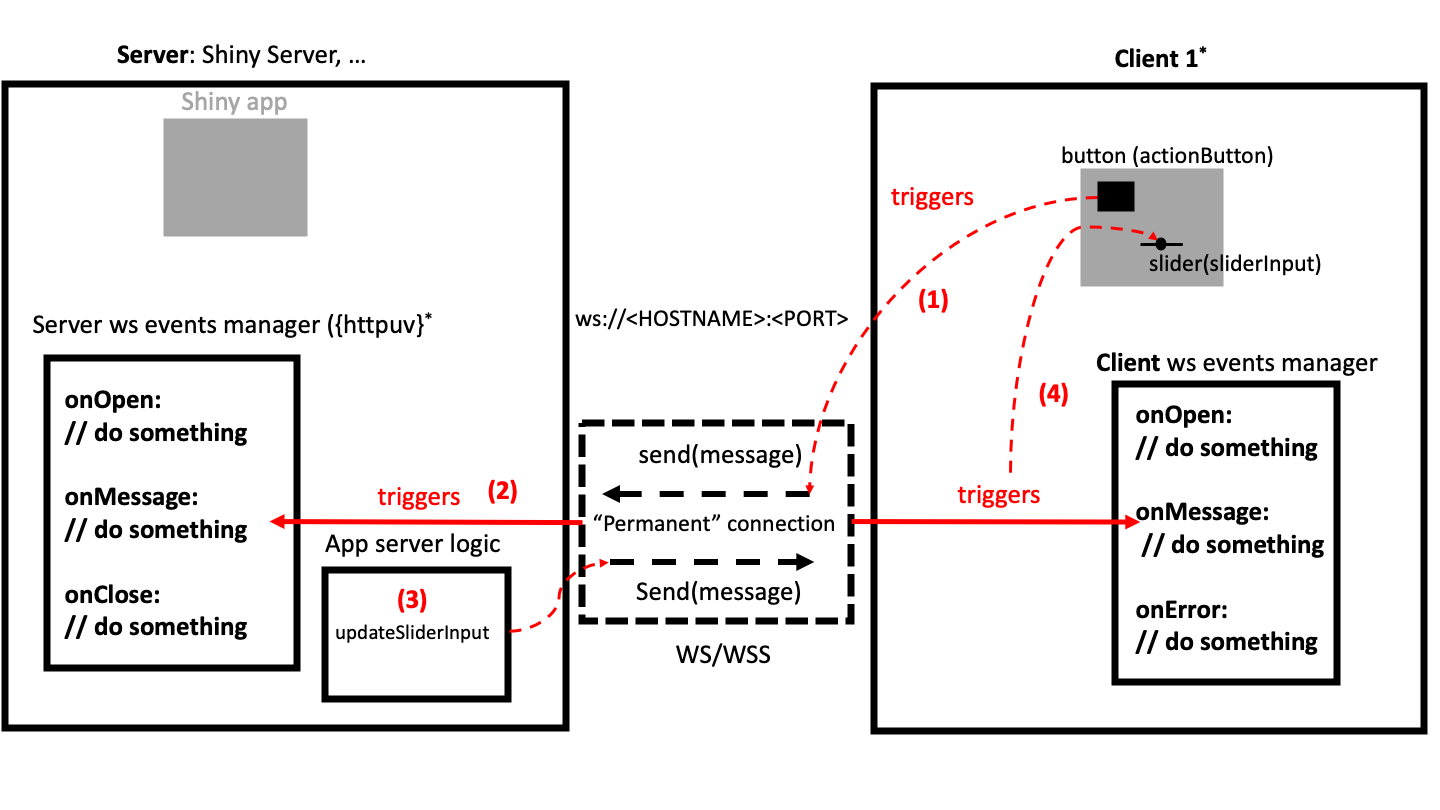
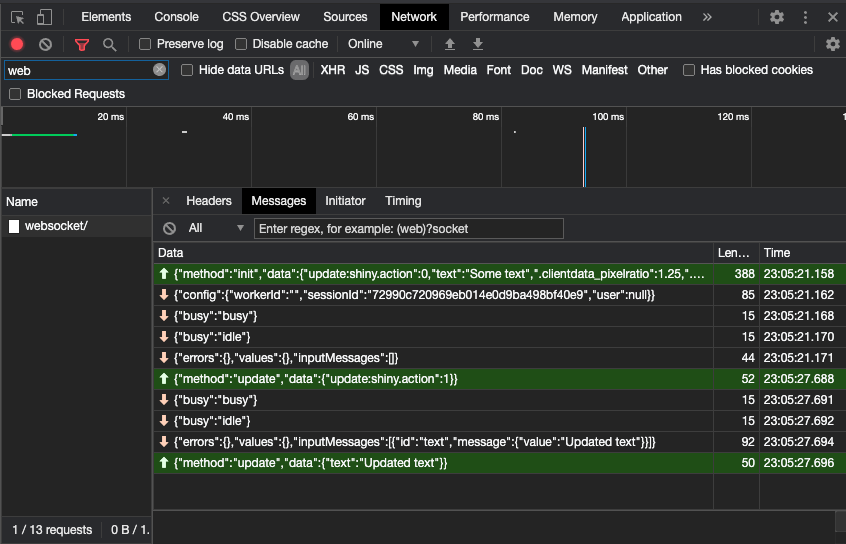
This is the magic piece allowing bidirectional communication between R and JavaScript. The technology behind is provided by {httpuv} and {websocket}.
- Run the previous app
- Open the HTML inspector
- Select the
Networktab - Search for websocket
- Play with the app and observe!
A.3.4 From R to JS, from JS to R
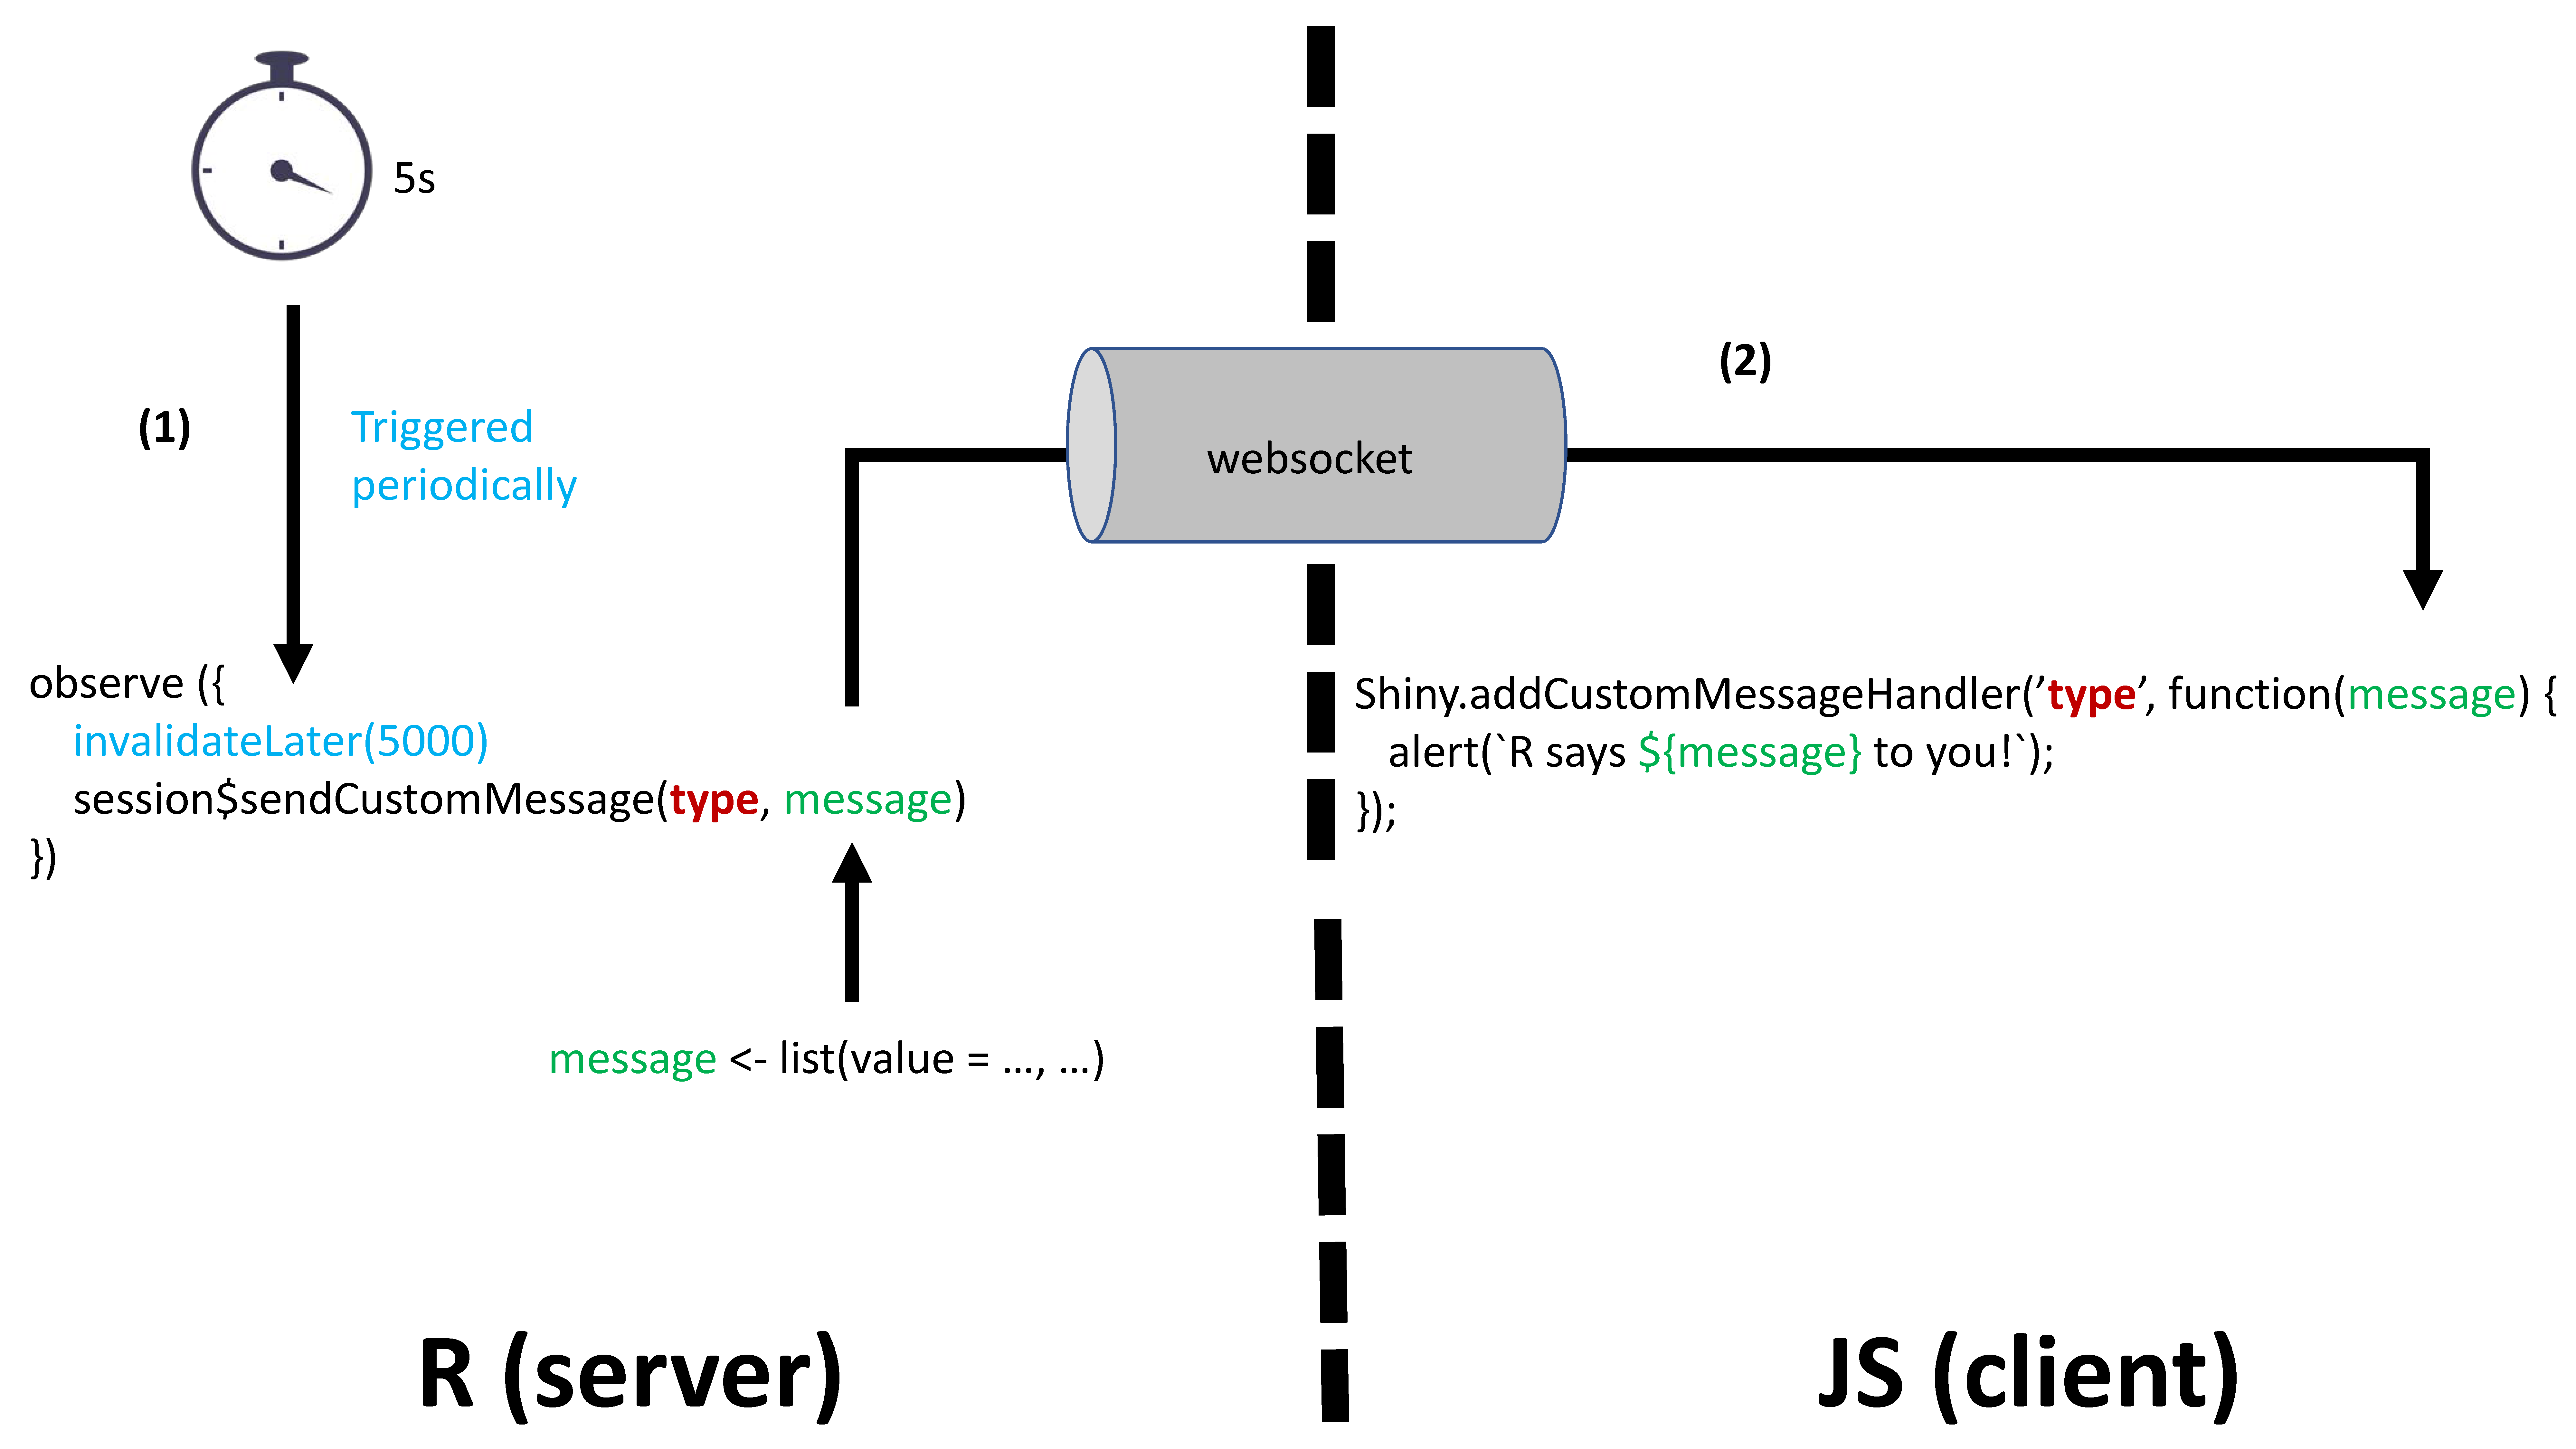
On the R side session is an instance of the ShinySession R6 class allowing to send messages to JS.
2 main methods:
sendCustomMessagesends R messages to JSsendInputMessagesends R messages to input bindings
Shiny.addCustomMessageHandler is the JS part of session$sendCustomMessage.
Both are linked by the type parameter!
A.4 Bulma JS for Shiny
In this part you'll need to work on the following RStudio Cloud project. We split the audience in 3 groups (1 instructor per group). Each group will choose between:
After the workshop, you'll have the opportunity to bring this change to the shinybulma repository.
20:00
B.1.1 The Shiny input system
Input tag structure
Input tags have various HTML structure.
<input id = inputId type = "text" class = "input-text" value = value>The simplest is probably the text input:
- id guarantees the input uniqueness. 1
- type define the input type
- class is generally targeted by JavaScript:
$('.input-text').action(); - value holds the input value
1 All instances of the same input share a unique input binding. Hence, id is mandatory!
B.1.2 The Shiny input system
Binding Shiny inputs
An input binding:
- Allows Shiny to identify each instance of a given input
- Describes what you may do with it.
- Receives messages from R ...
- ... tells when Shiny has to update the value for R
🗒 Bindings rely on a JS class defined in the input_binding.js file
var customTextBinding = new Shiny.InputBinding();In the following, we'll need devtools::install_github("DivadNojnarg/OSUICode")
B.2.1 The binding steps: find
The idea is to locate the input in the DOM.
We generally filter by class, scope being the document.
find: function(scope) { console.log($(scope).find('.input-text')); return $(scope).find('.input-text');}Run the following and open the HTML inspector.
library(OSUICode)customTextInputExample(1)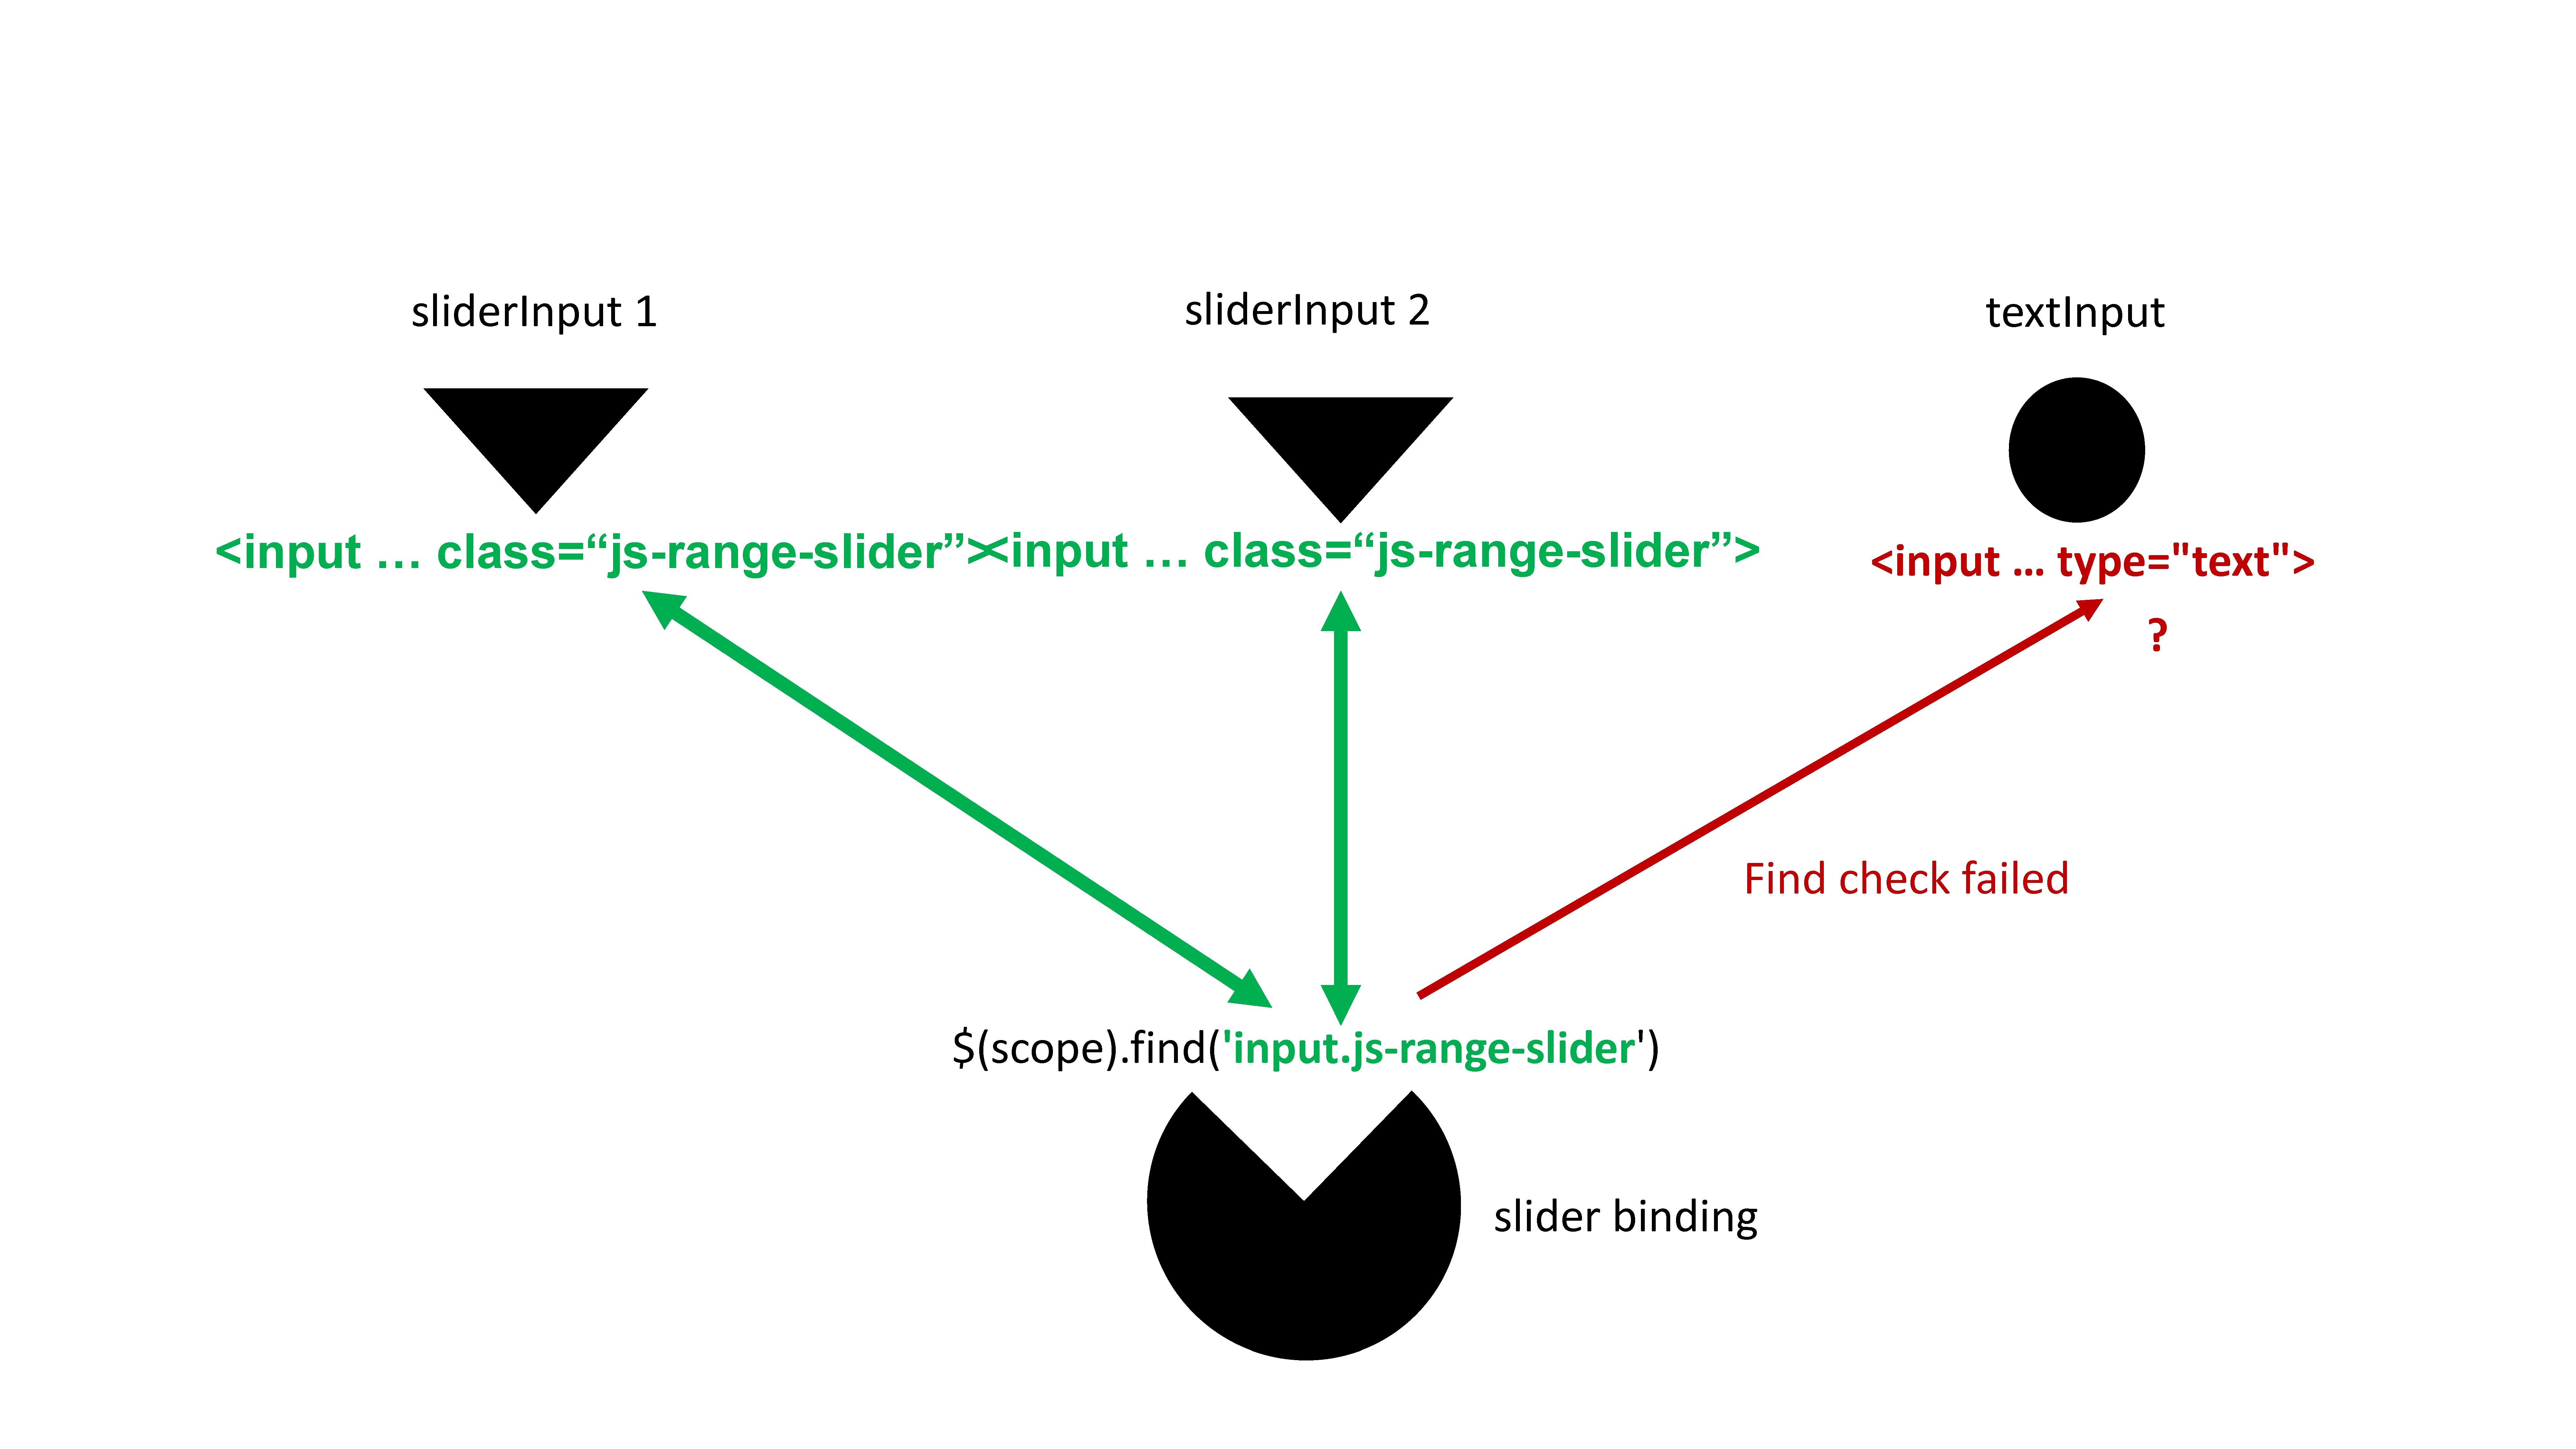
B.2.3 The binding steps: get the value
This step ensures that R gets the input value at any time. The jQuery val method allows to get the current value.
getValue: function(el) { return $(el).val();}- Run the following and open the HTML inspector
- Update the text content
- What happens? Why?
customTextInputExample(2)B.2.4 The binding steps: set and update
setValue(el, value) is used to set the input value. It called within receiveMessage(el, data), which is the JS part of all the R updateInput functions.
setValue: function(el, value) { $(el).val(value);}receiveMessage: function(el, data) { console.log(data); if (data.hasOwnProperty('value')) { this.setValue(el, data.value); } // other parameters to update...}Run the following and open the HTML inspector. Why doesn't the output value change?
updateCustomTextInputExample(3)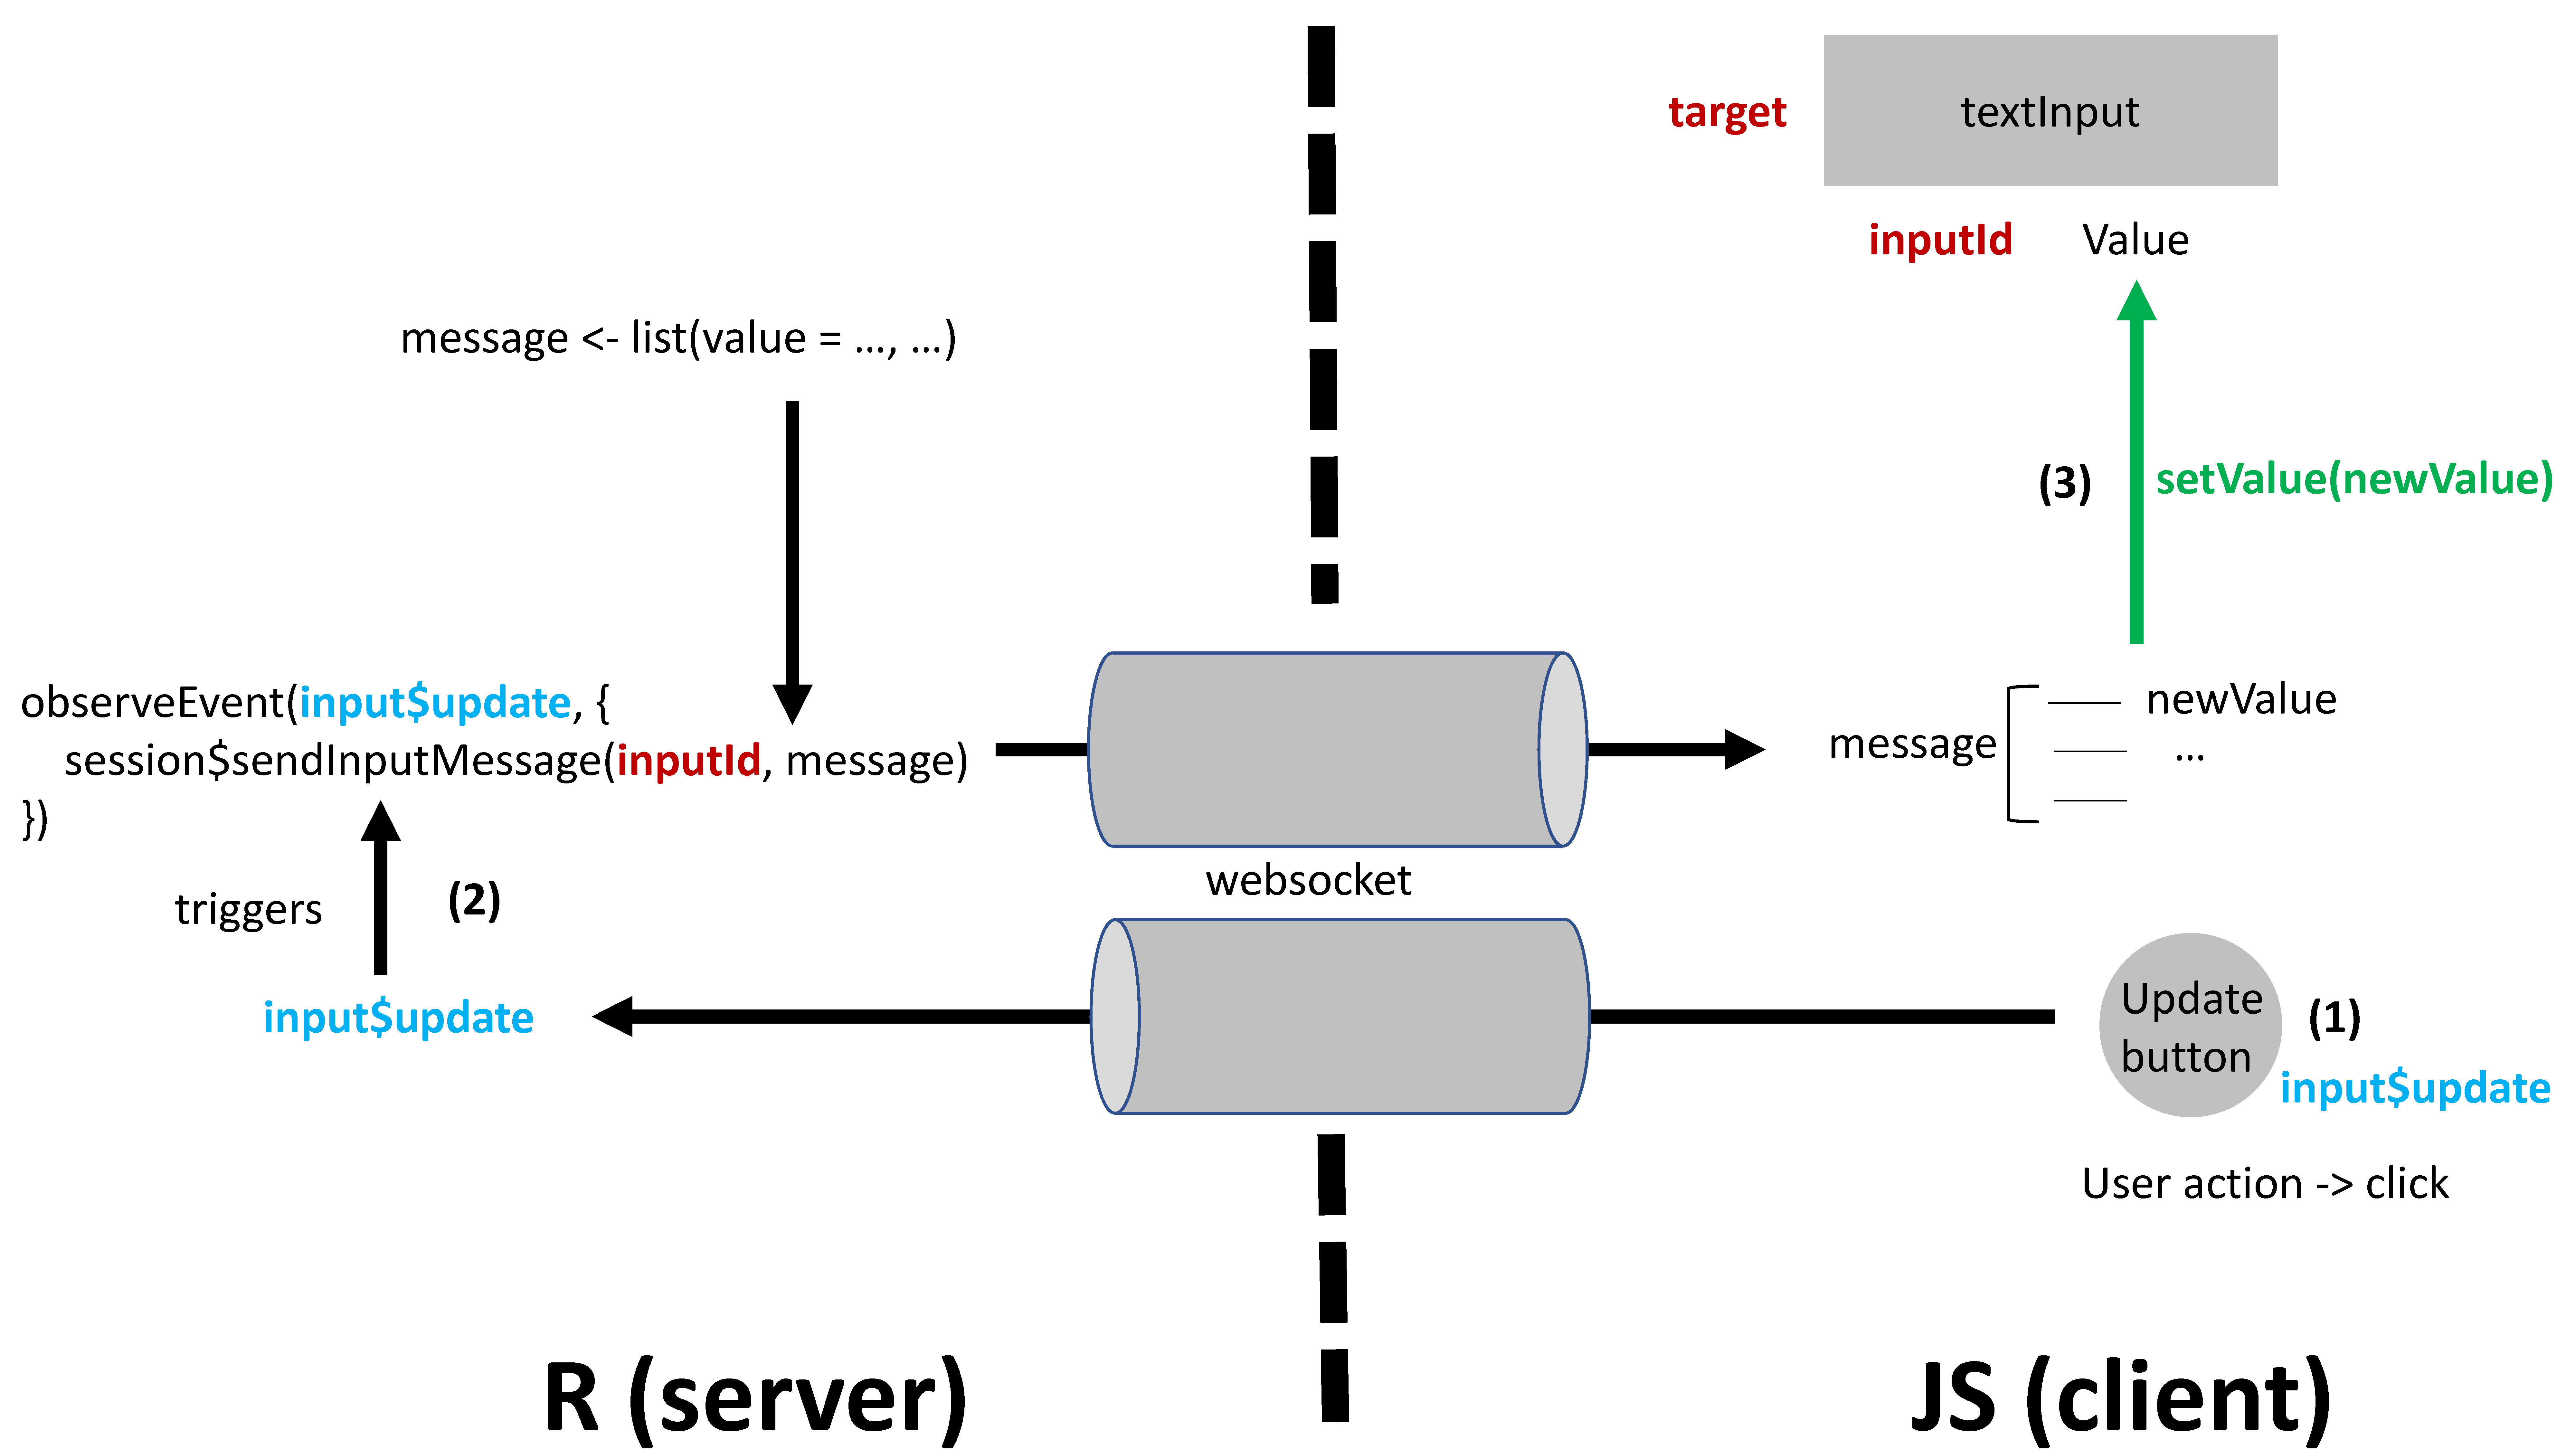
B.2.5 The binding steps: subscribe
subscribe(el, callback) listens to events defining Shiny to update the input value and make it available in the app. For a text input, we might have:
subscribe: function(el, callback) { // when updated $(el).on('change.customTextBinding', function(event) { callback(false); }); // keyboard, copy and paste, ... $(el).on('keyup.customTextBinding input.customTextBinding', function(event) { callback(true); });}Run the following demonstration.
updateCustomTextInputExample(4)updateCustomTextInputExample(5)callback() tells to update the input on the server (R). If true, a rate policy is applied!
B.2.6 The binding steps: rate policies
As mentioned before, callback(true) will set rate policy for the given event listener. Setting a rate policy is relevant when we don’t want to flood the server with tons of update requests.
getRatePolicy: function() { return { // Can be 'debounce' or 'throttle' policy: 'debounce', delay: 500 };}Below, the text input only updates after releasing the keyboard for 250ms.
updateCustomTextInputExample(6)B.3 Box on Steroids!
Boxes are a center element of {shinydashboard}. Yet the latter only exploit 10% of their
capability. Your mission: unleash the AdminLTE API to deliver box on steroids! Open box_on_steroids.Rmd.
20:00
Part 3. Custom Outputs
A.1 Structure
A brief plan of this part of the workshop
Serve data as an HTTP response and read it in JavaScript to produce an HTML output.😮
- Discover HTTP 1.1 🌐.
- Learn to serve HTTP 1.1 in shiny
- Exercise in
Unleash-Shiny-Exercises-Part-3RStudio Cloud. - Discover shiny outputs ➡️
- Exercise in
Unleash-Shiny-Exercises-Part-3RStudio Cloud. - Q&A ❓
Have Unleash-Shiny-Exercises-Part-3 ready, it will come in handy.
A.1 Multi page applications 📃 📃 📄
"Traditional" applications and websites
HTTP 1.1
A new page is requested
- Client requests
/, server responds - Client requests
/about, server gives a different response - Client requests
/products, server gives a yet a different response and so on
💡 Think {plumber}
A.1.2 What about shiny?
So which one of those does shiny use?
Both!
But one (probably) more than the other...
When you visit a shiny app:
- Your browser makes an HTTP request to the shiny
serverwhich responds with the initialui. - All subsequent communication is done via websocket (
input,output).
No other /page is ever visited in shiny
A.1.2 HTTP response Headers
HTTP header ~ meta data: gives necessary information to the browser.
Importantly:
Status- How is the response?404not found200all good500server-side error301redirect
Content-Type- type of content ('text/html', 'application/json', etc.)Content- content to render
These are all standardized, we don't get to choose.
A websocket sends binary data so there is no need for headers.
A.1.3.1 HTTP response name & path
path <- session$registerDataObj(name = "about", data, filterFunc)Since the response if only valid for a single session the path returned is dynamically generated.
Example paths for different sessions:
session/0a6ed2556d97dcaa1ddeb615dc04cd1e/dataobj/aboutsession/259b8dc2f18ffc975b246d206b60073f/dataobj/aboutsession/72abd5a5da9a1651bee32d25a908a0cd/dataobj/about
What is this path anyway❓
It's where the HTTP response is served❗
A.1.3.2 HTTP response filterFunc & data
path <- session$registerDataObj(name = "about", data = "<h1>Hello!</h1>", filterFunc)The core of it all: it actually serves the HTTP response.
# filterFuncfunction(data, req){ shiny:::httpResponse( status = 200, # default content_type = "text/html", # default content = data )}Note: httpResponse is not exported, hence the :::
A.1.3.4 HTTP response JSON
Minor changes to return JSON data.
path <- session$registerDataObj( name = "cars-data", data = cars, function(data, req) { # seralise to JSON res <- jsonlite::toJSON(data) shiny:::httpResponse( content_type = "application/json", content = res ) })[ { "speed": 4, "dist": 2 }, { "speed": 4, "dist": 10 }]B.3 Level Layout
Meet "box" our soon-to-be custom output ❗

🔗 bulma.io/documentation/layout/level
B.4.8 Level renderBox.R (1)
Internally all render* functions return another function()❗
It's a function! 🎉
shiny::exprToFunction({ head(cars, 10)})## function () ## {## head(cars, 10)## }We can run it 🎉
fn <- shiny::exprToFunction({ x <- 1 x + 3})fn()## [1] 4Shiny = Reactivity: functions are easier to rerun
output$something <- you actually assign a function ❗
B.4.9 Level renderBox.R (2)
Great, render* returns a function, but what about that one then 😕
renderSomething <- function(expr){ func <- shiny::exprToFunction(expr) # assigned to `output` function(){ data <- func() # sent to the JavaScript binding return(data + 1) }}The result of render* is a function, the result of which is sent to the JavaScript binding 💡
B.4.13 Level skeleton
Eerily similar to inputs: 1) initialise, 2) extend, 3) register.
var boxBinding = new Shiny.OutputBinding();$.extend(boxBinding, { find: function(scope) { return $(scope).find(".box"); }, renderValue: function(el, data) { // Get the serialised JSON // Use it to render content }});Shiny.outputBindings.register(boxBinding, "pharma.box");B.4.14 Level renderValue
The renderValue in the JavaScript binding the following:
function(el, data) { // httr::GET (1) fetch(data) // httr::content (2) .then(response => response.json()) // lapply | purrr::map (3) .then(data => { data.map((row)=>{ let div = createElement(row); $(el).append(div); }) })}Args
elthe element (boxOutput)datathe path sent byrenderBox
Logic
- Fetch the data
- Extract JSON from response
- Loop over data
- Create
level-item - Append to
<nav>
- Create
C.1 Where to go from here
Numerous improvements could be made.
- The
boxfunction could accept a model and extract relevant statistics - The output could use other JavaScript libraries to animate the numbers for instance
- Or the value could be colored dependening on a threshold
- Add methods so
boxaccepts different kinds of objects (e.g.:xts) - Add an inline chart
Plenty more can be done!
Part 4. Shiny's Hidden Gems
How to get the last changed input?
ui <- fluidPage( textInput('txt_a', 'Input Text A'), textInput('txt_b', 'Input Text B'), uiOutput('txt_c_out'), verbatimTextOutput("show_last"))server <- function(input, output, session) { output$txt_c_out <- renderUI(textInput('txt_c', 'Input Text C')) values <- reactiveValues(lastUpdated = NULL) observe({ lapply(names(input), function(x) { observe({ input[[x]] values$lastUpdated <- x }) }) }) output$show_last <- renderPrint(values$lastUpdated)}We leverage Shiny.setInputValue and Shiny JS events. shiny:inputchanged
fires each time an input is changed!
$(document).on('shiny:inputchanged', function(event) { Shiny.setInputValue('pleaseStayHome', {name: event.name, value: event.value, type: event.binding.name.split('.')[1]});});On the R side, we listen to input$pleaseStayHome. That's it!
The {shinylogs} package developed by dreamRs contains this feature:
shinyApp( ui = fluidPage( numericInput("n", "n", 1), sliderInput("s", "s", min = 0, max = 10, value = 5), verbatimTextOutput("lastChanged") ), server = function(input, output, session) { # specific to shinylogs track_usage(storage_mode = store_null()) output$lastChanged <- renderPrint(input$`.shinylogs_lastInput`) })How to send notifications from JS?
Don't forget that Shiny is a JS object having the notifications.show method!
We add onclick to an actionButton.
ui <- fluidPage( actionButton( "notif", "Show notification", onclick = "Shiny.notifications.show({ html: '<strong>Oups</strong>', type: 'error', duration: 2000 });" ))server <- function(input, output, session) {}shinyApp(ui, server)How to hijack a binding? 
Case study: we would like to modify the action button behavior on the fly.
Steps:
- Wait for the
shiny:connectedevent - Unbind all inputs
- Access the
Shiny.inputBindingsregistry - Extend the binding
- Apply the new changes with
bindAll
$(function() { $(document).on('shiny:connected', function(event) { Shiny.unbindAll(); $.extend(Shiny .inputBindings .bindingNames['shiny.actionButtonInput'] .binding, { // do whathever you want to edit existing methods }); Shiny.bindAll(); });});How to interact with a binding from JS?
What if you don't want to update input from the server? 🤷
- Define the trigger
- Define the target
- Capture the target input binding
- Use
setValueto add new value - Trigger any relevant event mentioned in
subscribe(tells Shiny to update from the R side)
$(function() { // each time we click on #test (a button) $('#test').on('click', function() { var $obj = $('#button'); var inputBinding = $obj.data('shiny-input-binding'); var val = $obj.data('val') || 0; inputBinding.setValue($obj, val + 10); $obj.trigger('click'); });});


